Tutorial
The studio, step by step
Everything you can do in the studio, in the order you'll need it. Each part stands on its own: jump straight to what interests you.
1. Getting started
- On the website, tap Try it free: for 14 days, the studio is yours, downloads included, no credit card needed: all its features and about one design in four; the others carry a padlock until you buy.
- Type your first name and your email address, then tap Create my account. To sign in again later, a password or a simple link sent by email is enough.
- The studio welcomes you, asks three questions about your machine (see My machine), then offers a short guided tour.
- In My account, tap Buy the studio for life: a single payment, no subscription. If you have a code, open I have a discount code before paying. Your invoice (with VAT) arrives by email and can be downloaded any time from My account.
2. A tour of the studio
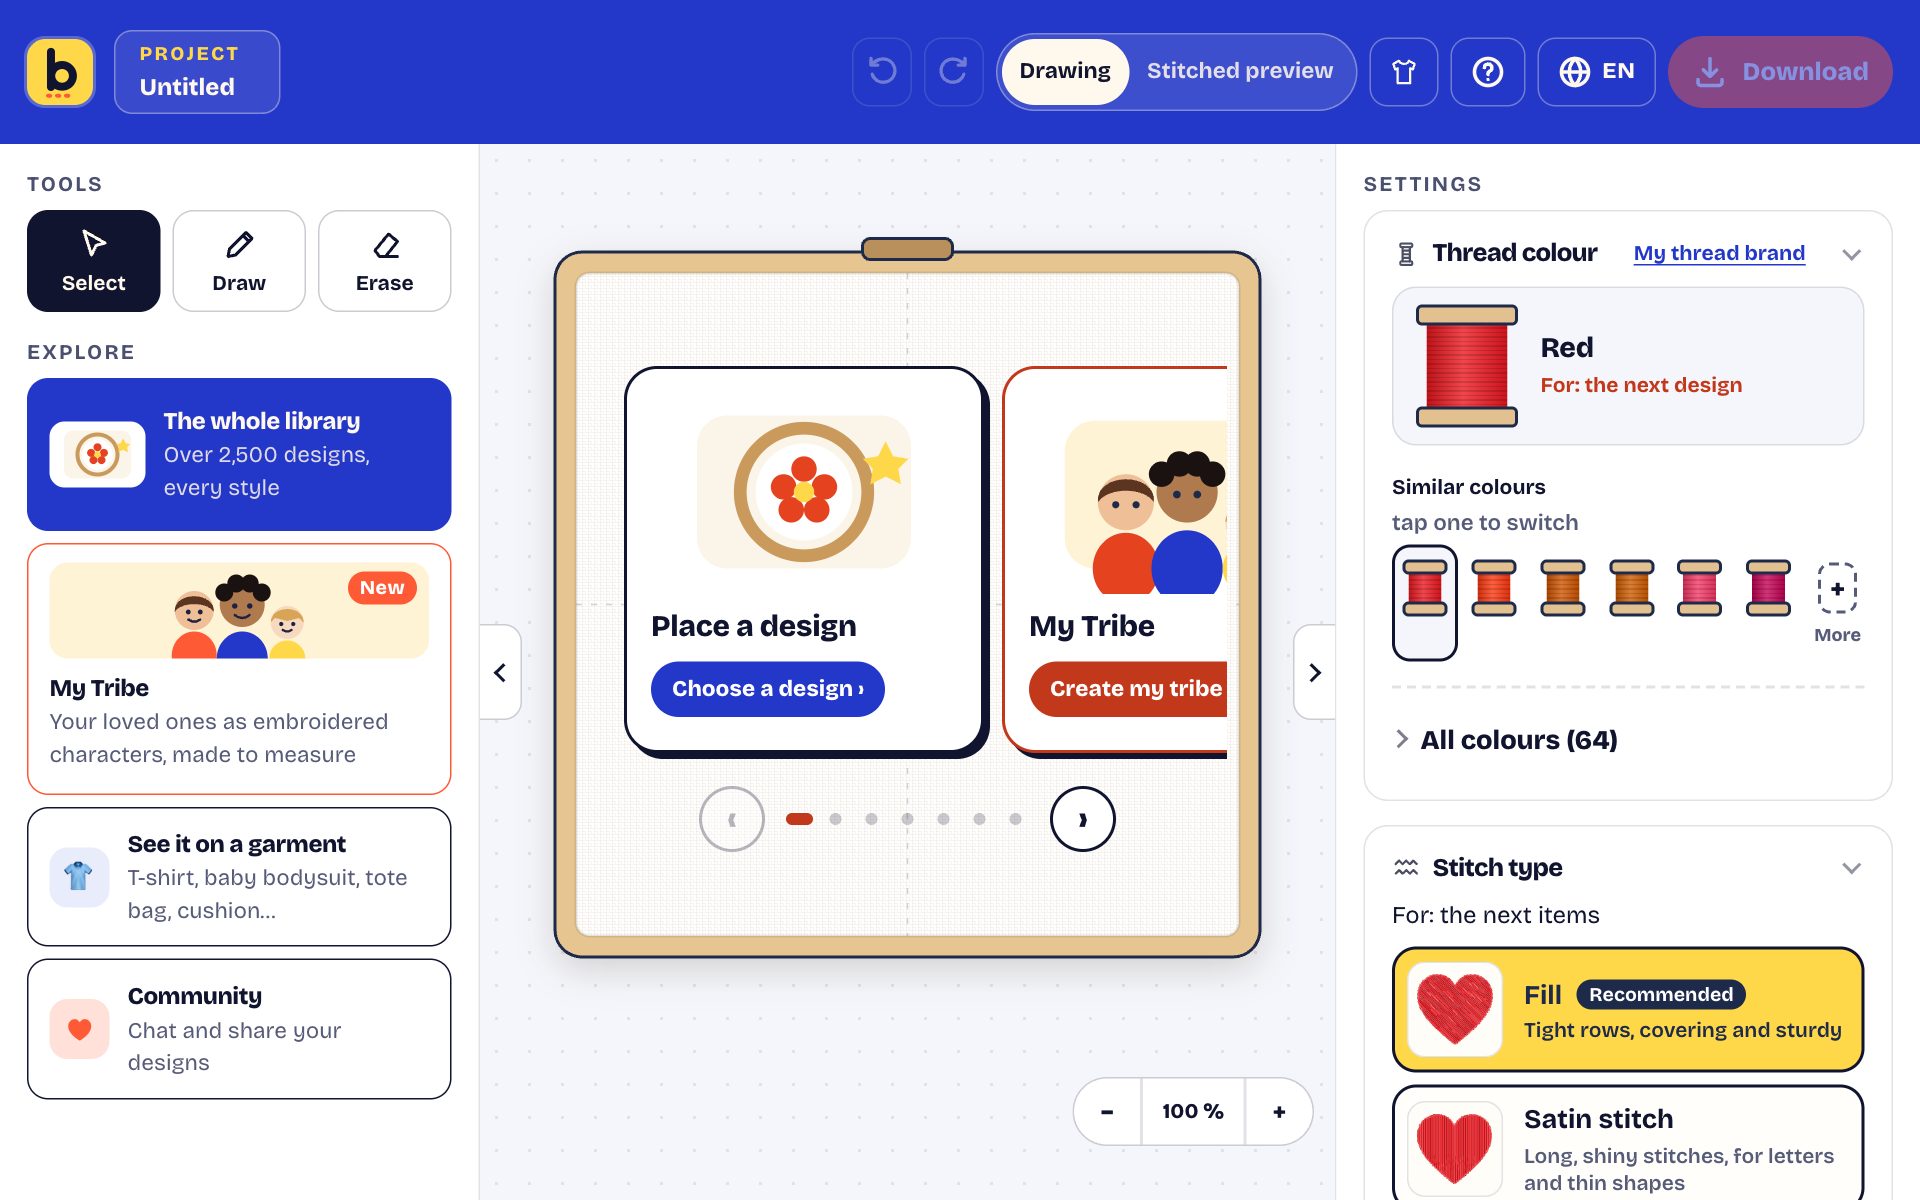
The studio fits on a single screen:
- on the left, the Tools (Select, Draw, Erase), then Explore (the whole library, My Tribe, see it on a garment, the community), Add to the hoop (a text, a photo, an SVG file or an embroidery file) and the designs sorted into sections;
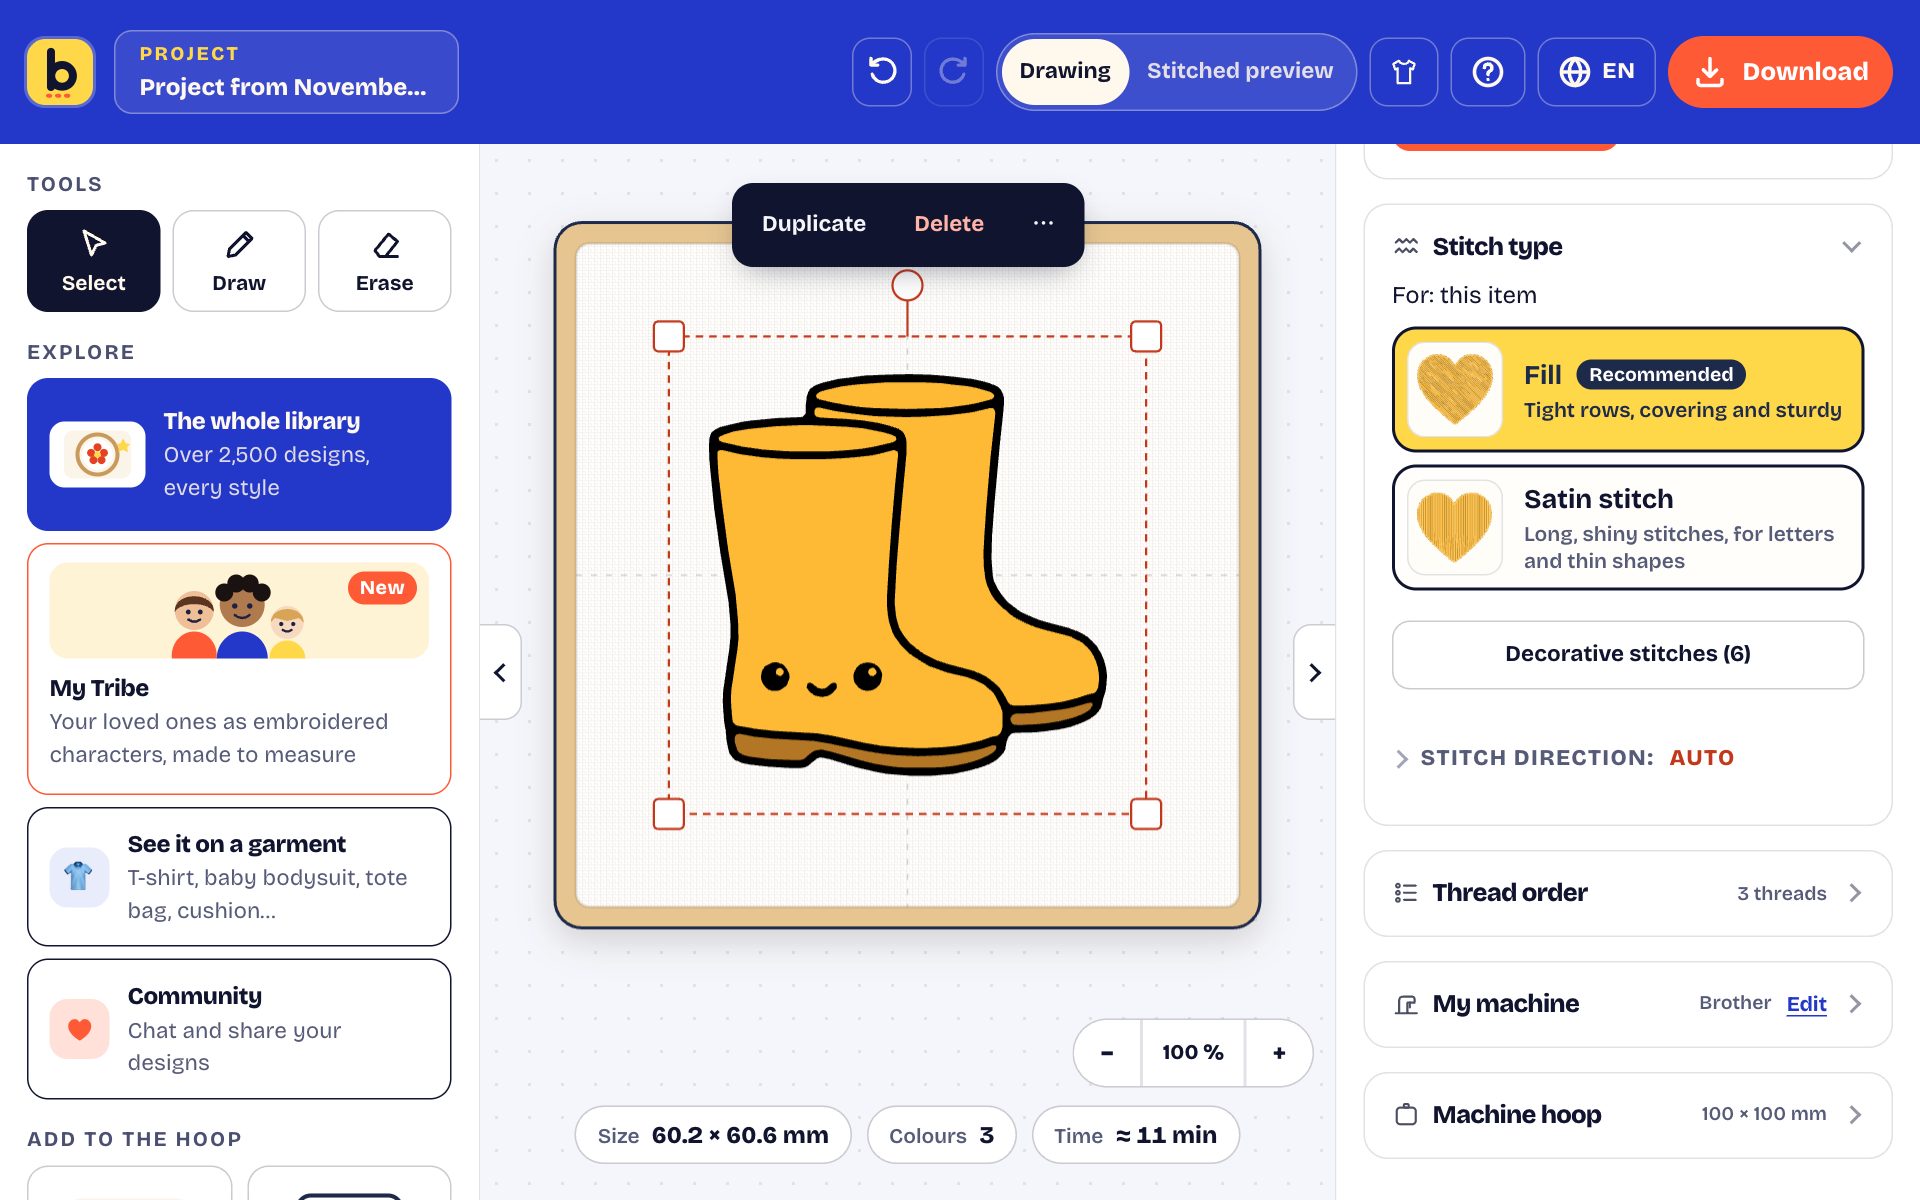
- in the middle, your machine's hoop at actual size, with the design size, the number of colours and the stitching time underneath;
- on the right, the Settings: thread colour, stitch type, thread order, My machine and the machine hoop. They follow what you're doing: with the pencil they show the line, with the eraser its size;
- at the top, the Project menu, undo and redo, Drawing / Stitched preview, the T-shirt (see it on an item), the question mark (help), the language and Download.
When the hoop is empty, Where to start? cards appear in the hoop: place a design, My Tribe, write a name, a photo, draw, import an SVG or open an embroidery file. Scroll through them with the arrows.
On a computer, each section of the columns folds with a click on its title, and the little arrows at the edge of the hoop fold a whole column to give it more room. The studio remembers.
3. My machine: brand, hoop and threads
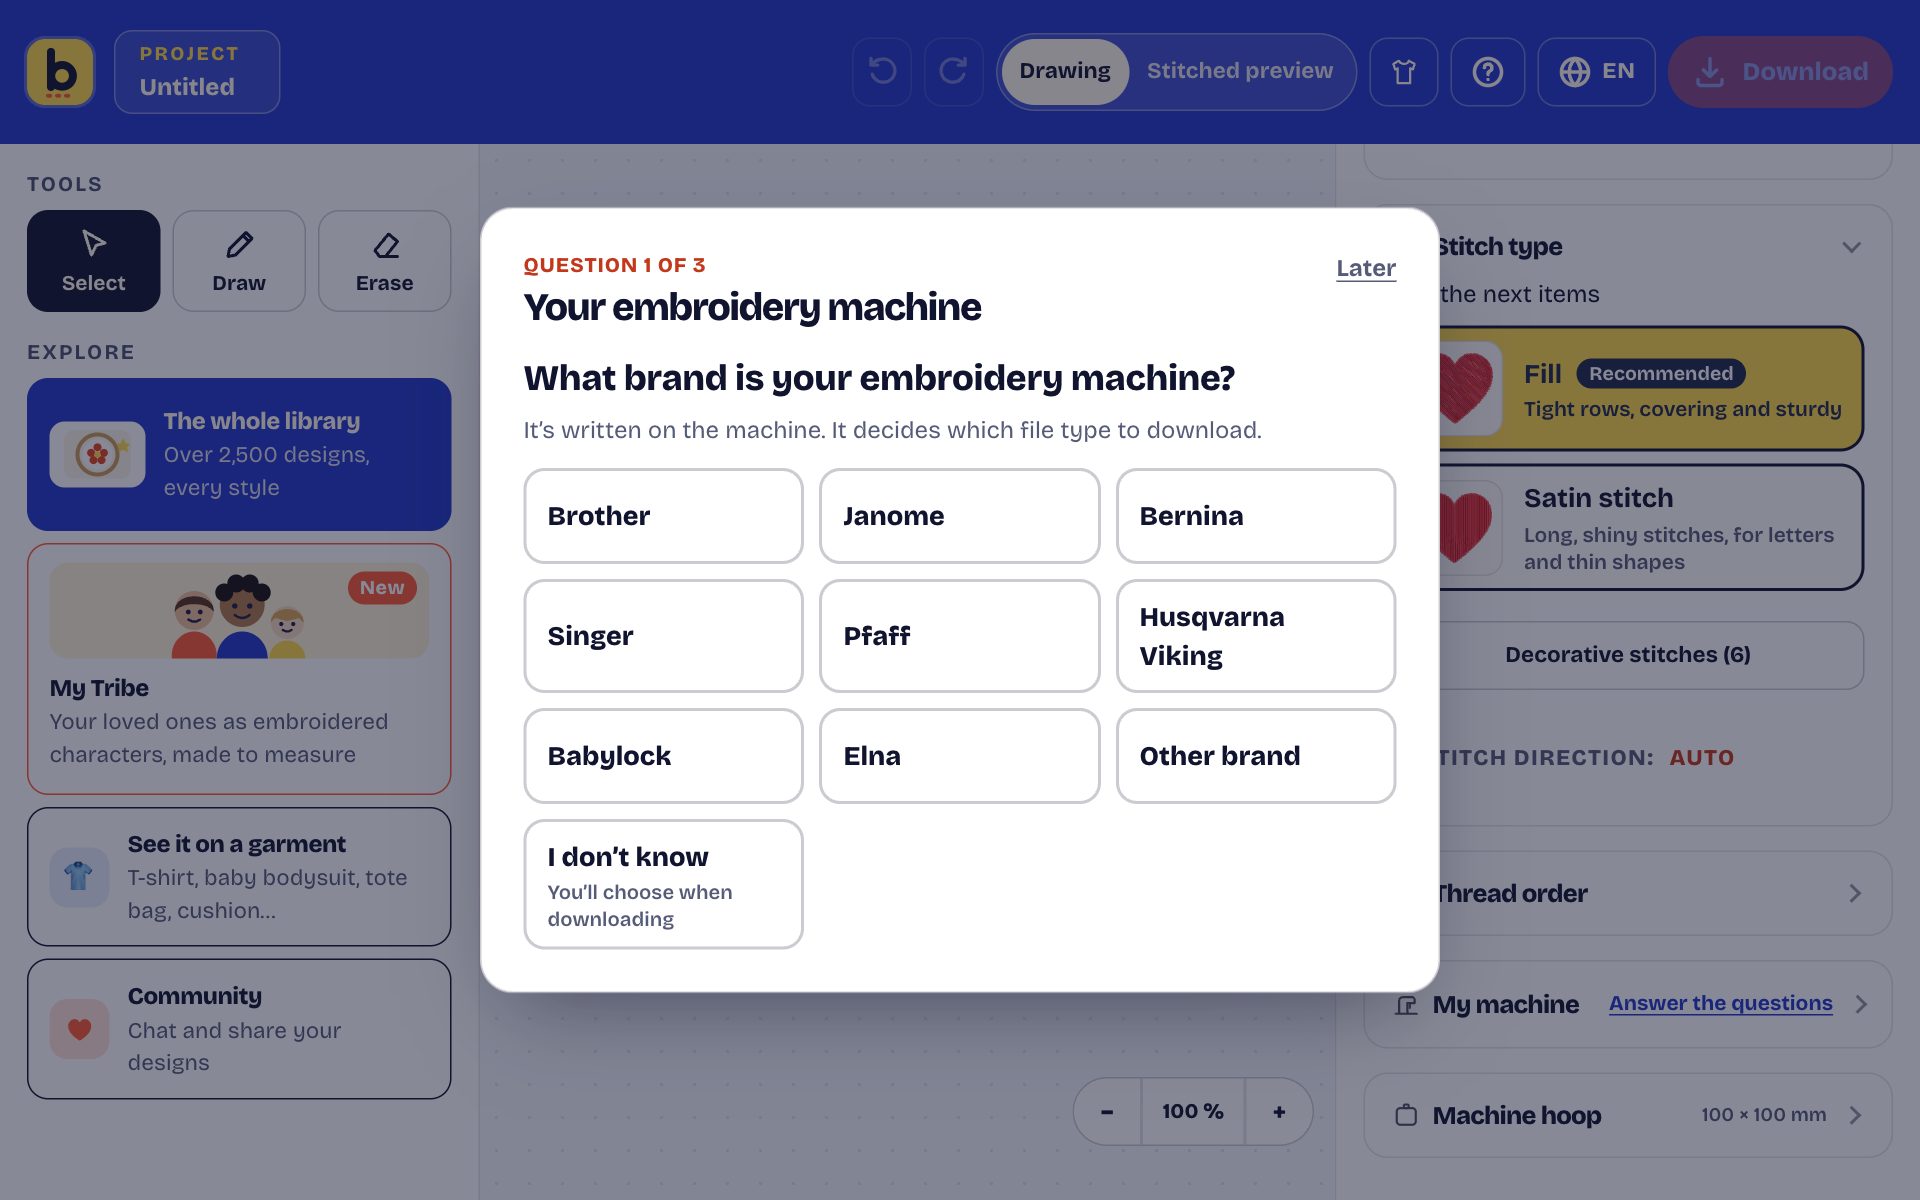
On your first visit, My machine asks three questions, one per screen:
- the brand of your machine (Brother, Janome, Bernina, Singer, Pfaff, Husqvarna Viking, Babylock, Elna or another): it decides which file type to download;
- the size of your hoop (10 × 10 cm, the most common, 13 × 18 cm, 16 × 26 cm, 20 × 30 cm): this is the embroidery area, written on the hoop or in the manual;
- the brand of your threads, to see the number of your spools under each colour (see Changing colours).
I don’t know is always an option, and Later, at the top, puts the questions off until another time. To go back to them: My machine, at the bottom of the right-hand column, or the help menu (the question mark, at the top).
Your hoop isn't on the list? In the right-hand column, under Machine hoop, choose Other size… and type the width and height in millimetres. The studio remembers it for next time.

4. Placing a design
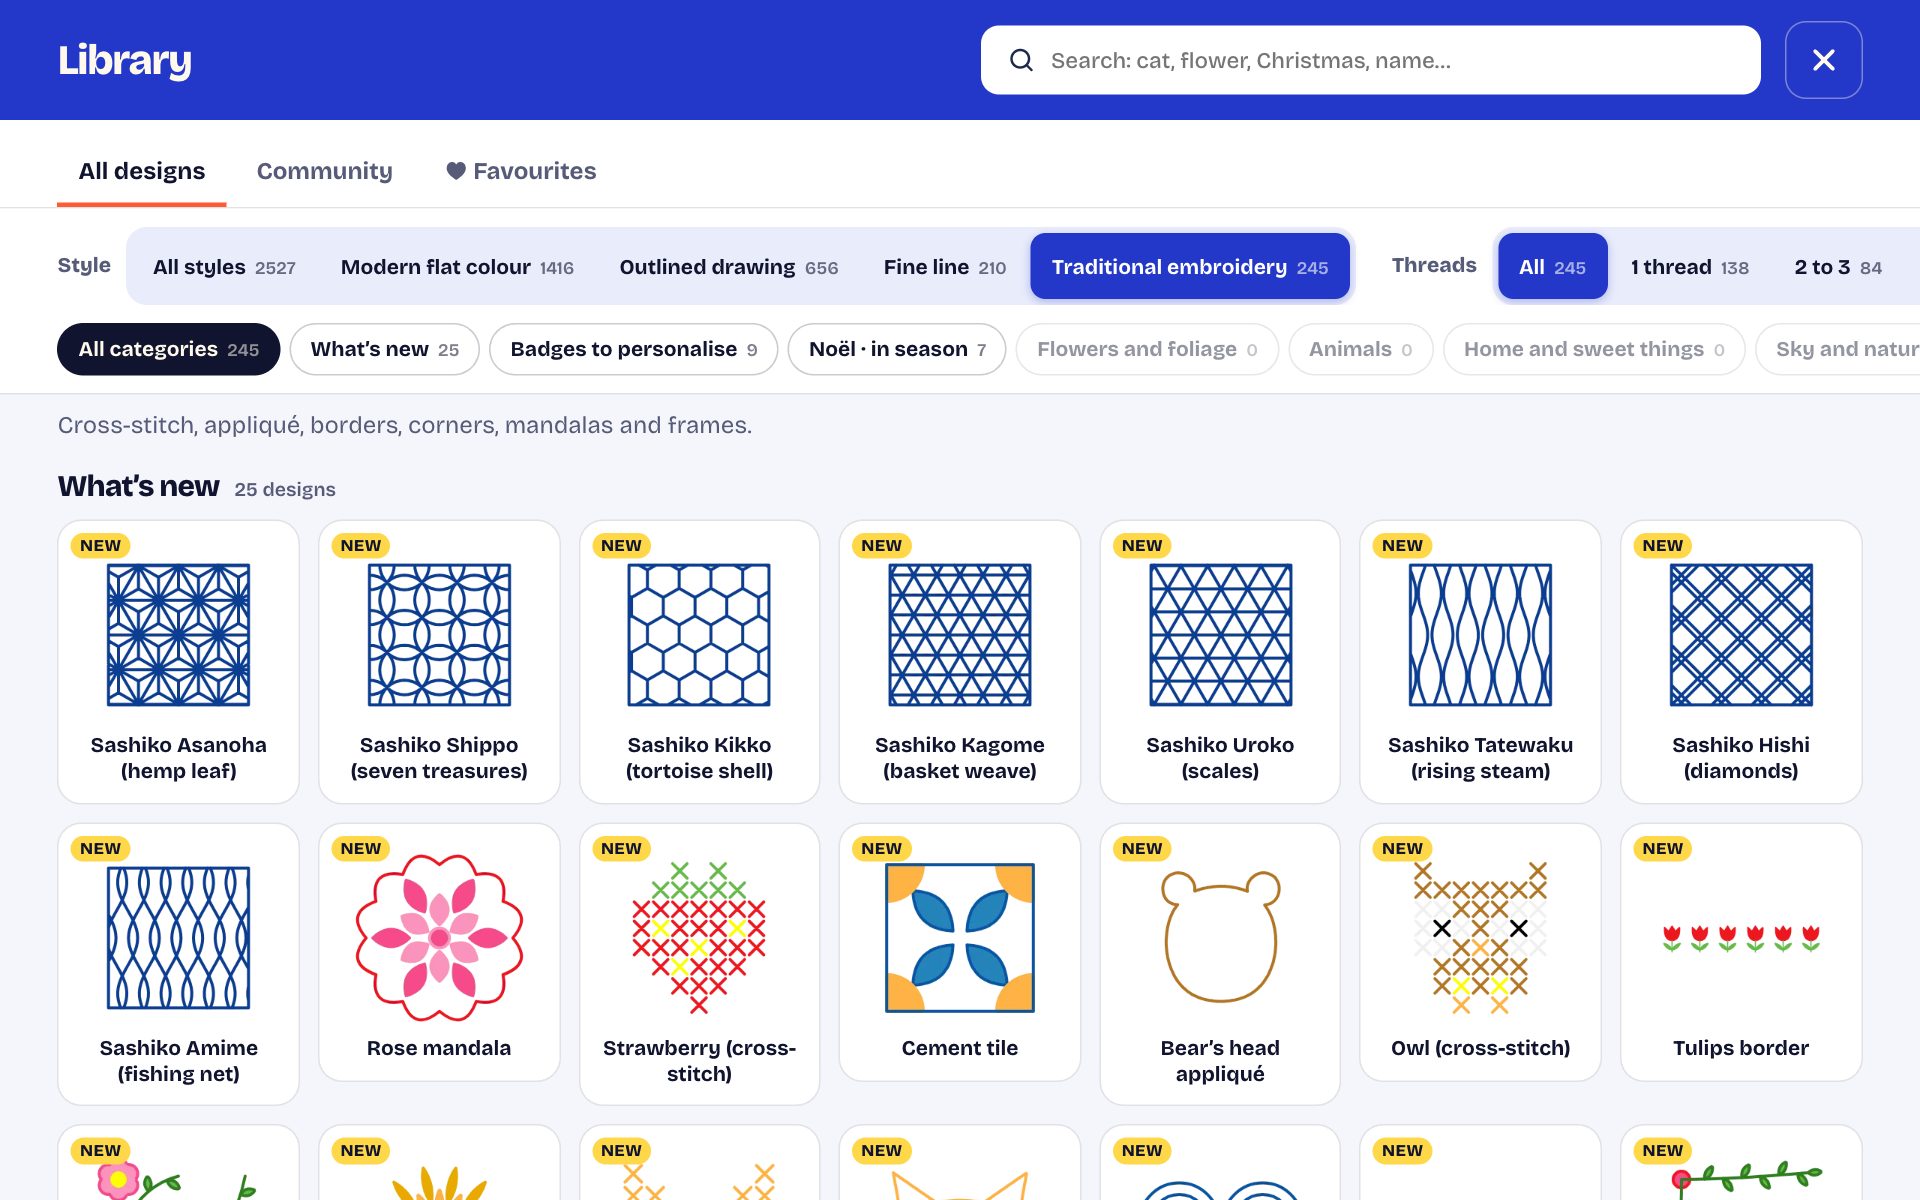
- Tap The whole library (left-hand column, under Explore): over 2,900 designs, sorted into sections (flowers, animals, baby, music, borders, cross-stitch, pixel art and video games, with space invaders in one to four colours, Japan and sashiko…).
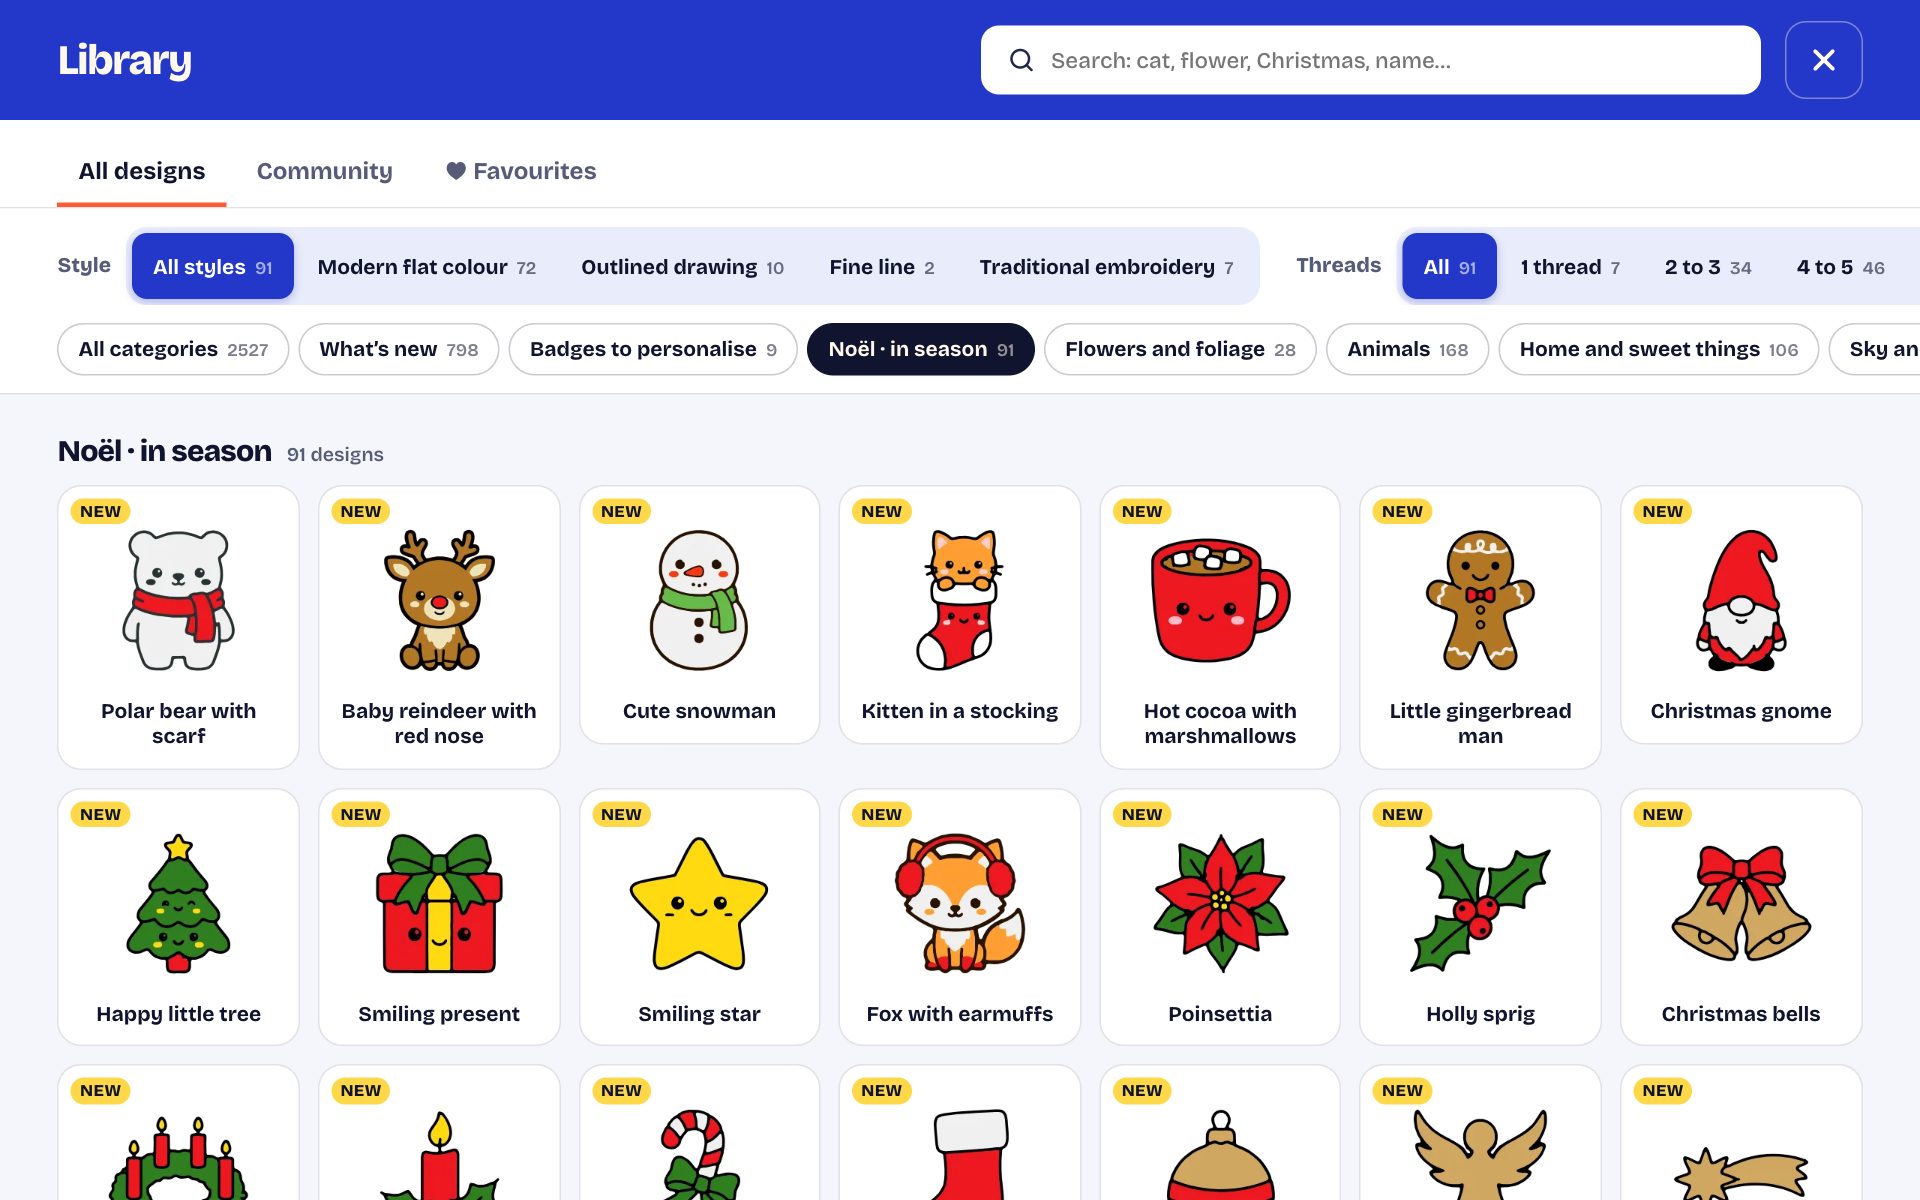
- The chips at the top take you straight to a section. Each one shows, in small print, how many designs it holds.
- The search understands a design's name, its section, its holiday, its colour and related words: “cat” also finds kittens, “kitty” finds cats, “red heart” finds red hearts, “Halloween” finds everything Halloween.
- The Style row keeps only the designs of one family: Modern flat colour, Outlined drawing, Fine line or Traditional embroidery (cross-stitch, appliqué, borders, mandalas). Handy for putting together a set that goes well together.
- The Japan and sashiko section brings together Japanese family crests (kamon) and sashiko grids: this traditional stitch is sewn here as even dashes, each dash stitched three times so it stands out, like the thick thread sewn by hand. You can also pick it for your own lines, among the stitches of the Draw tool.
- Appliqué designs (Appliqué section) are stitched in three stages, and the machine stops between each one: 1. a placement line shows where to lay the fabric; lay it down; 2. a tack-down stitch holds it in place; trim the excess close to the stitching; 3. the satin-stitch border covers the cut edge. The “Appliqué” thread for the first two passes can be the same as the satin stitch.
- The Threads row sorts designs by number of colours: 1 thread (no thread changes), 2 to 3, 4 to 5, or 6 and more. Handy for stitching quickly.
- Filters can be combined: for example “Animals” + “Fine line” + “1 thread”. If no design matches, the studio says so and offers to remove the filters.
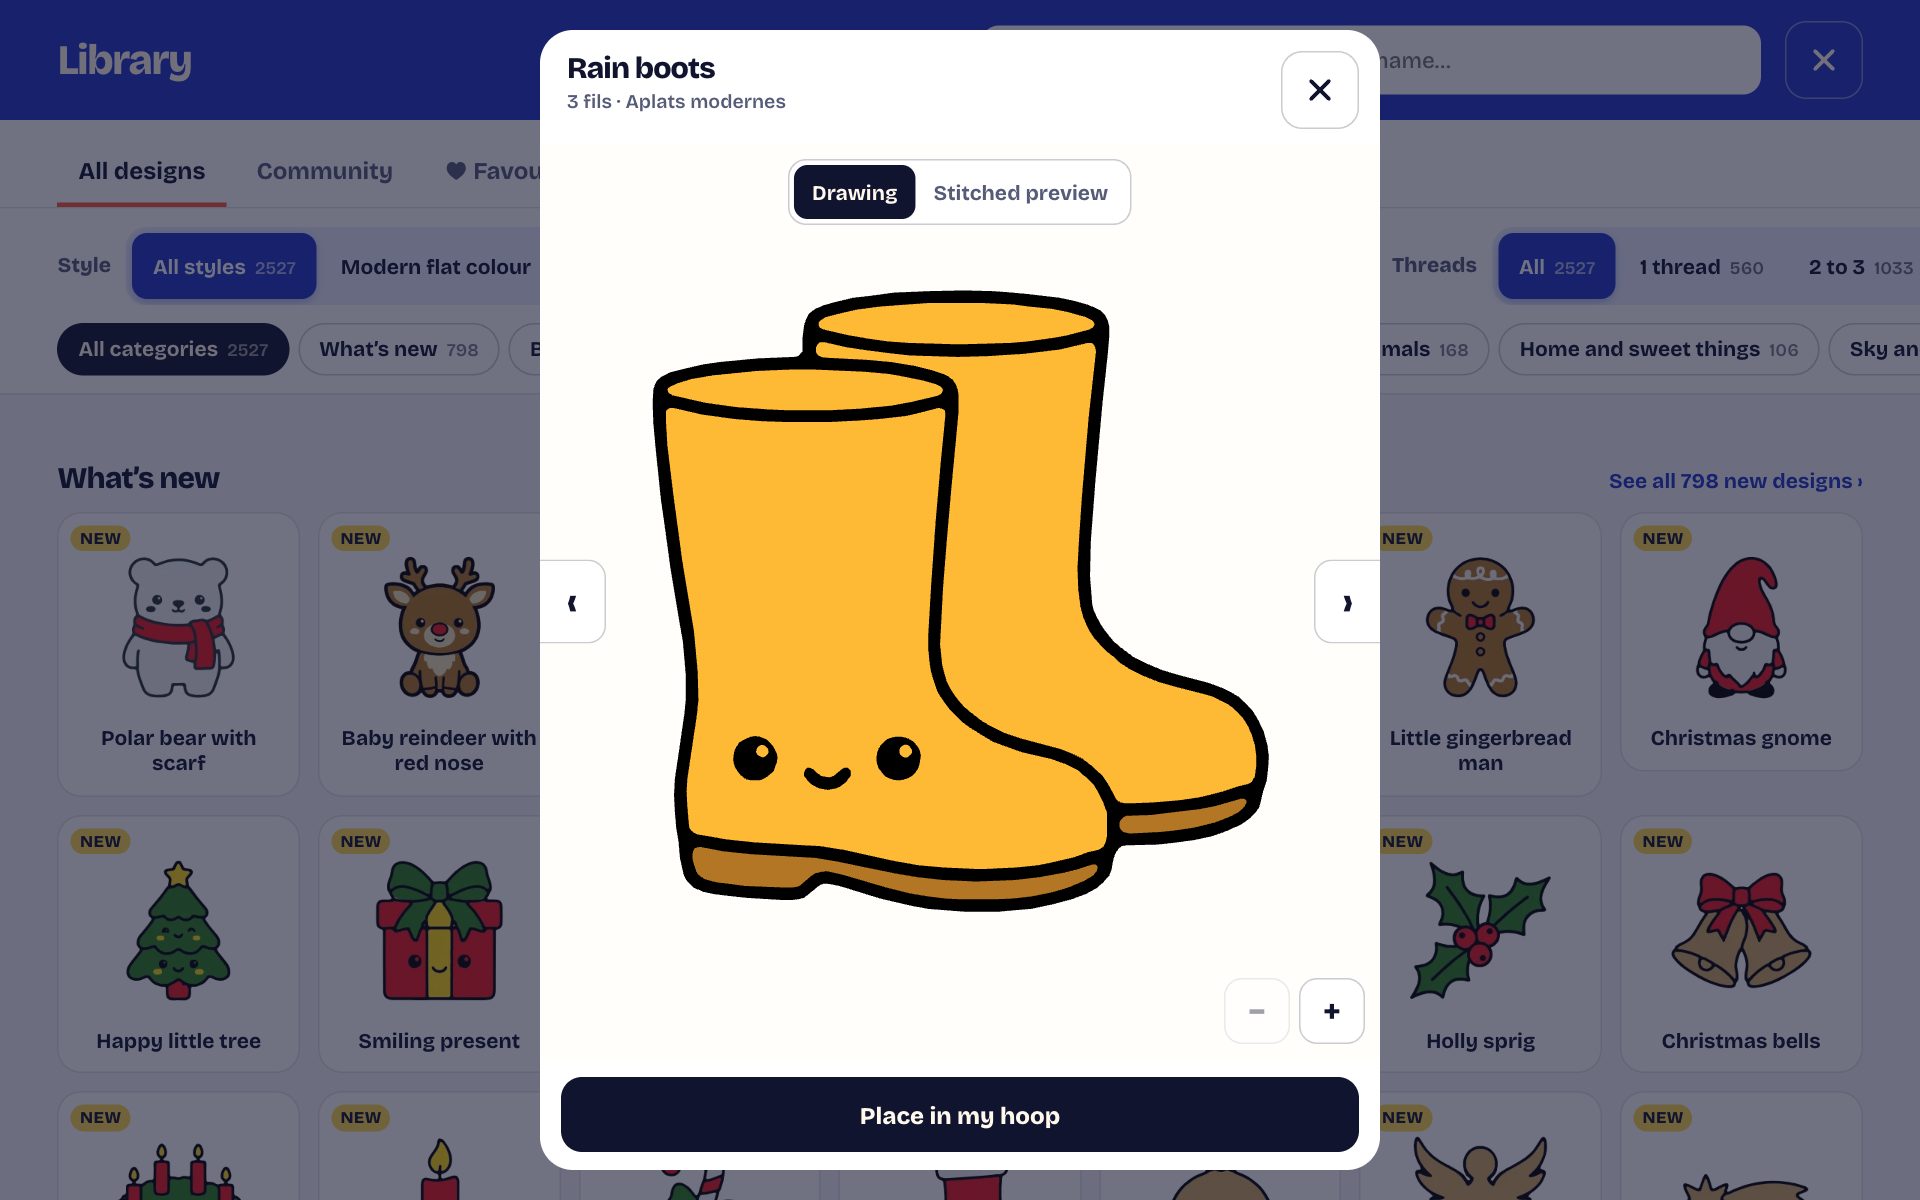
- Tap a design: its page opens large, as a Drawing or a Stitched preview, with its number of threads. Zoom with + and − (or with two fingers), move to the next design with the arrows, then tap Place in my hoop.
- The little heart keeps a design in your favourites, to find again in the tab of the same name.
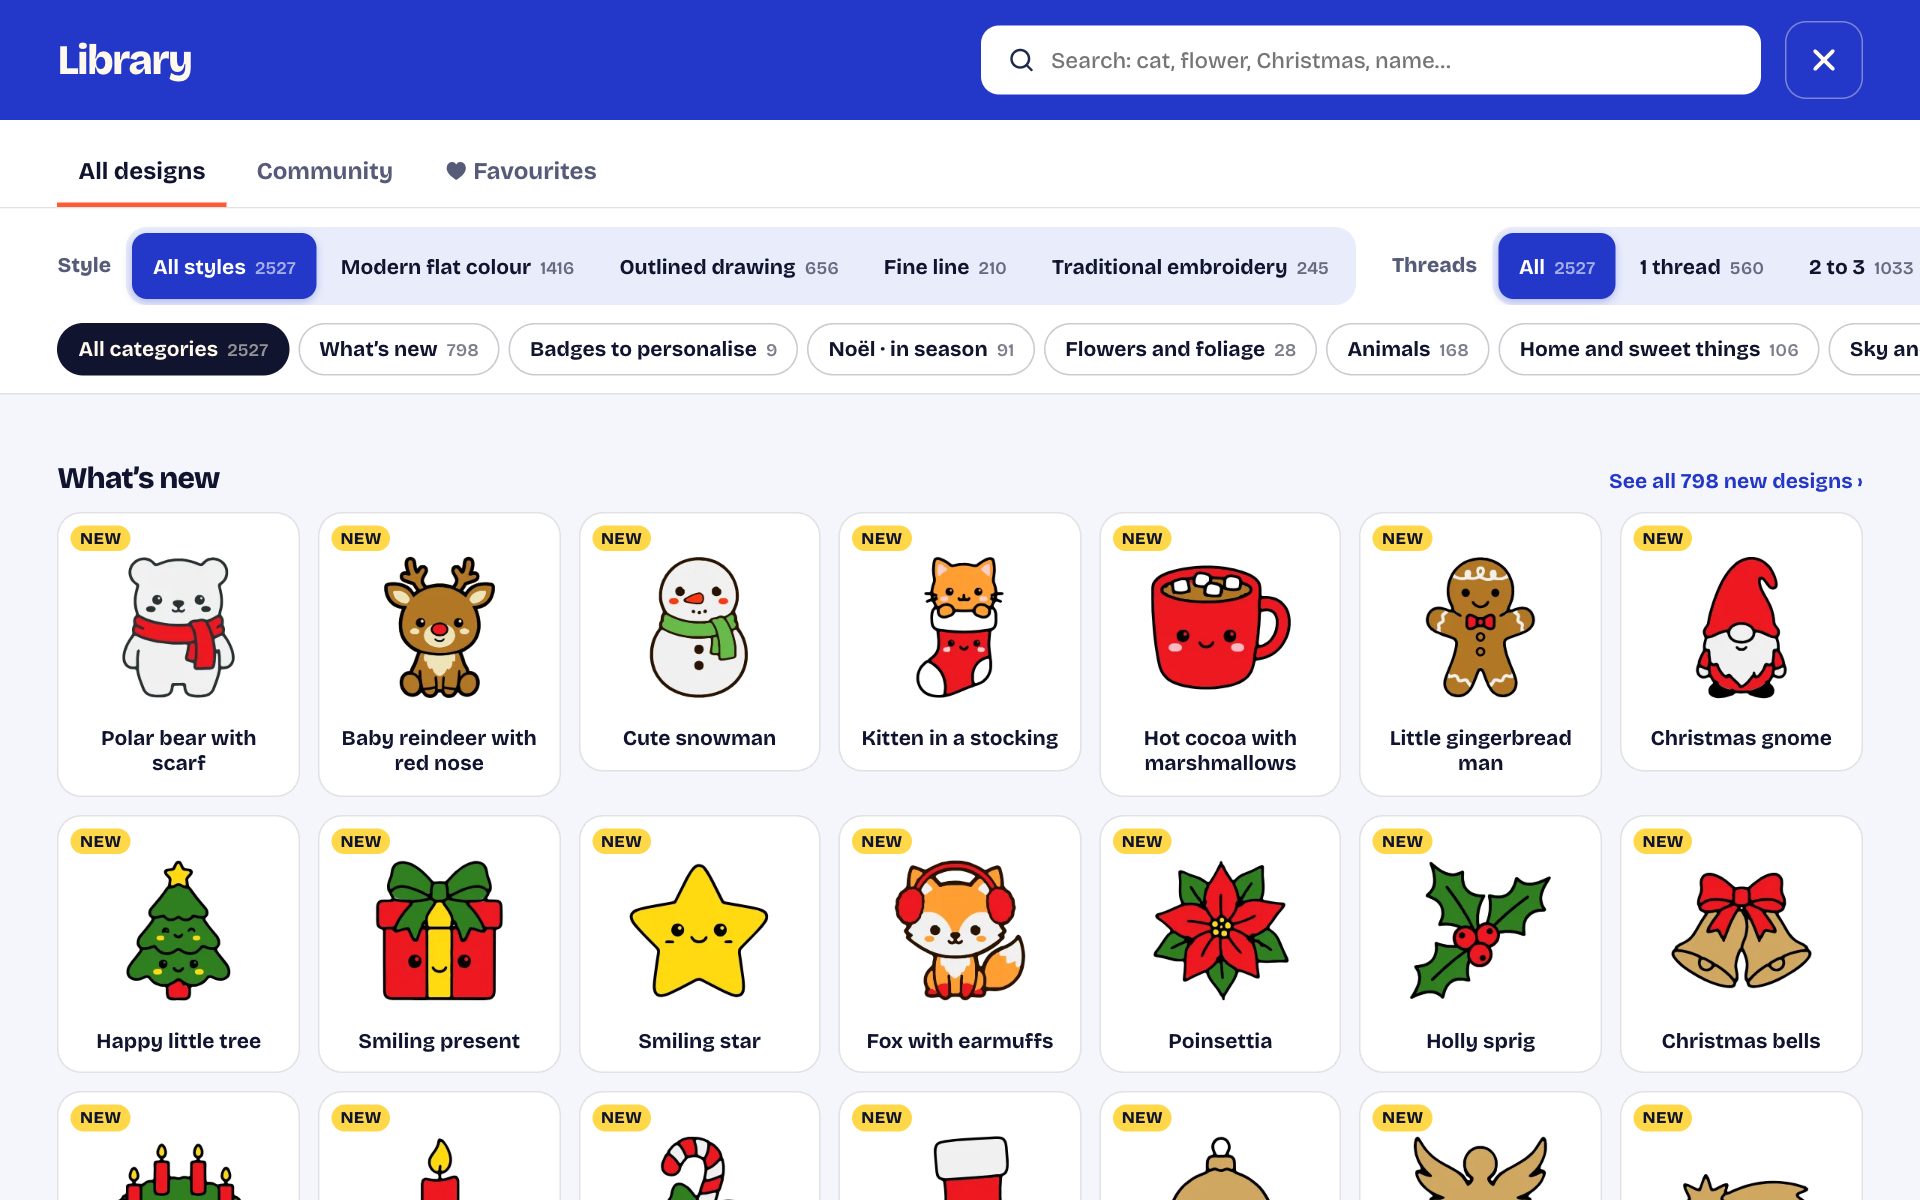
The coming holiday moves to the top: Halloween in October, Christmas in November and December, Valentine's Day in February… All the holidays remain available at the bottom of the library, under Seasons and holidays.
5. Move, resize, rotate
- Move: drag the design around the hoop.
- Make it bigger or smaller: drag one of the little corner squares, or use Size in the right-hand column. On a phone, pinch the design with two fingers.
- Rotate: drag the circle above the design, or use Rotate.
- The black bar above the design lets you duplicate, repeat, copy, cut, bring it to front or send it to back of the others, or delete it. When there isn't enough room, some of these actions move under ⋯.
- To pick up several items at once, draw a rectangle around them in an empty part of the hoop.
- Made a mistake? The Undo arrow at the top takes you back, as many times as you need.
6. Changing colours
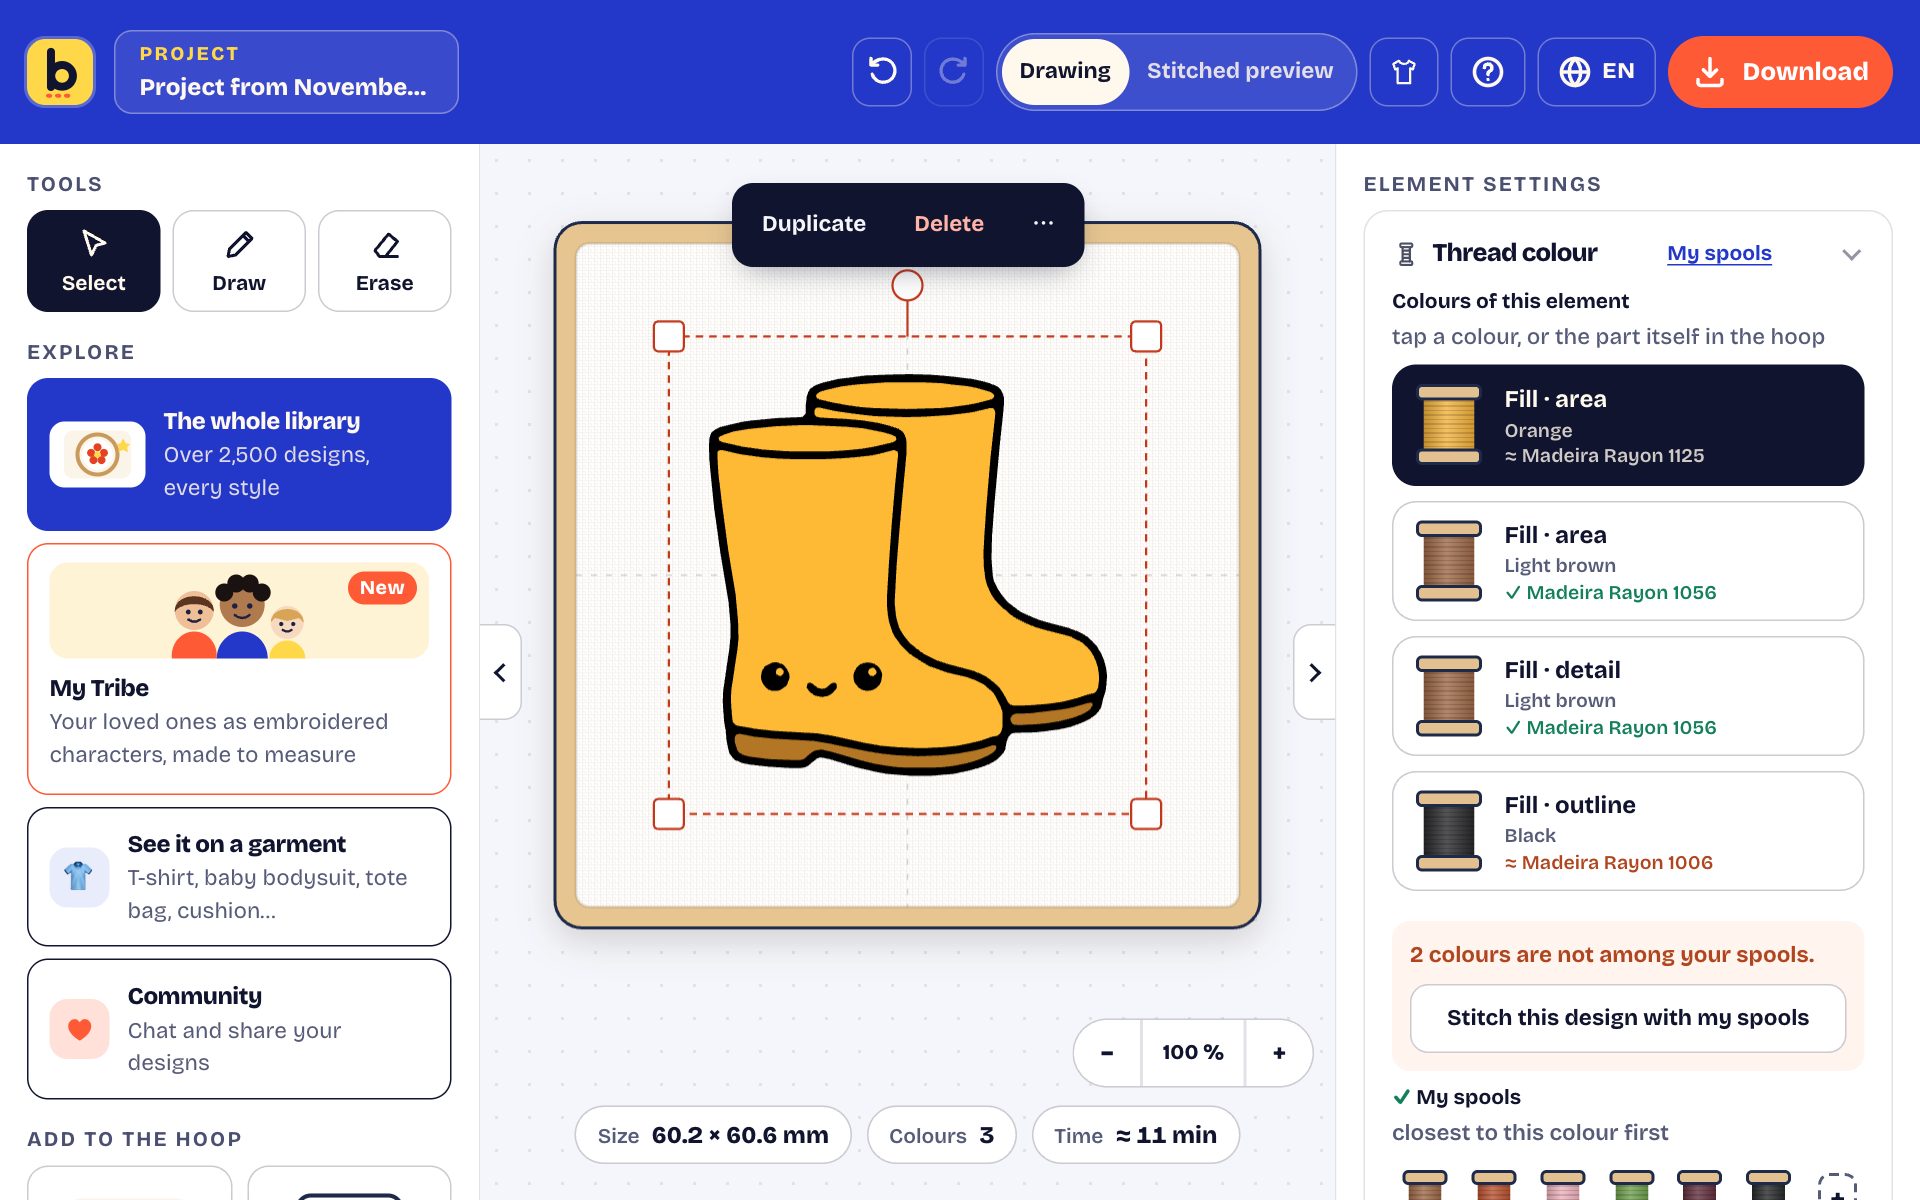
Tap a part of the design directly in the hoop, then a colour under Thread colour, at the top of the right-hand column. With nothing selected, the colour you pick is used for the next design.
- Colours of this element: tap a colour of the design and the choice opens in its place. If you have ticked your spools, they come first, the closest one circled; tap the one you want. Next colour moves on to the next one (those you don't own first), Done takes you back to the list. Tapping a part in the hoop also shows your spools first.
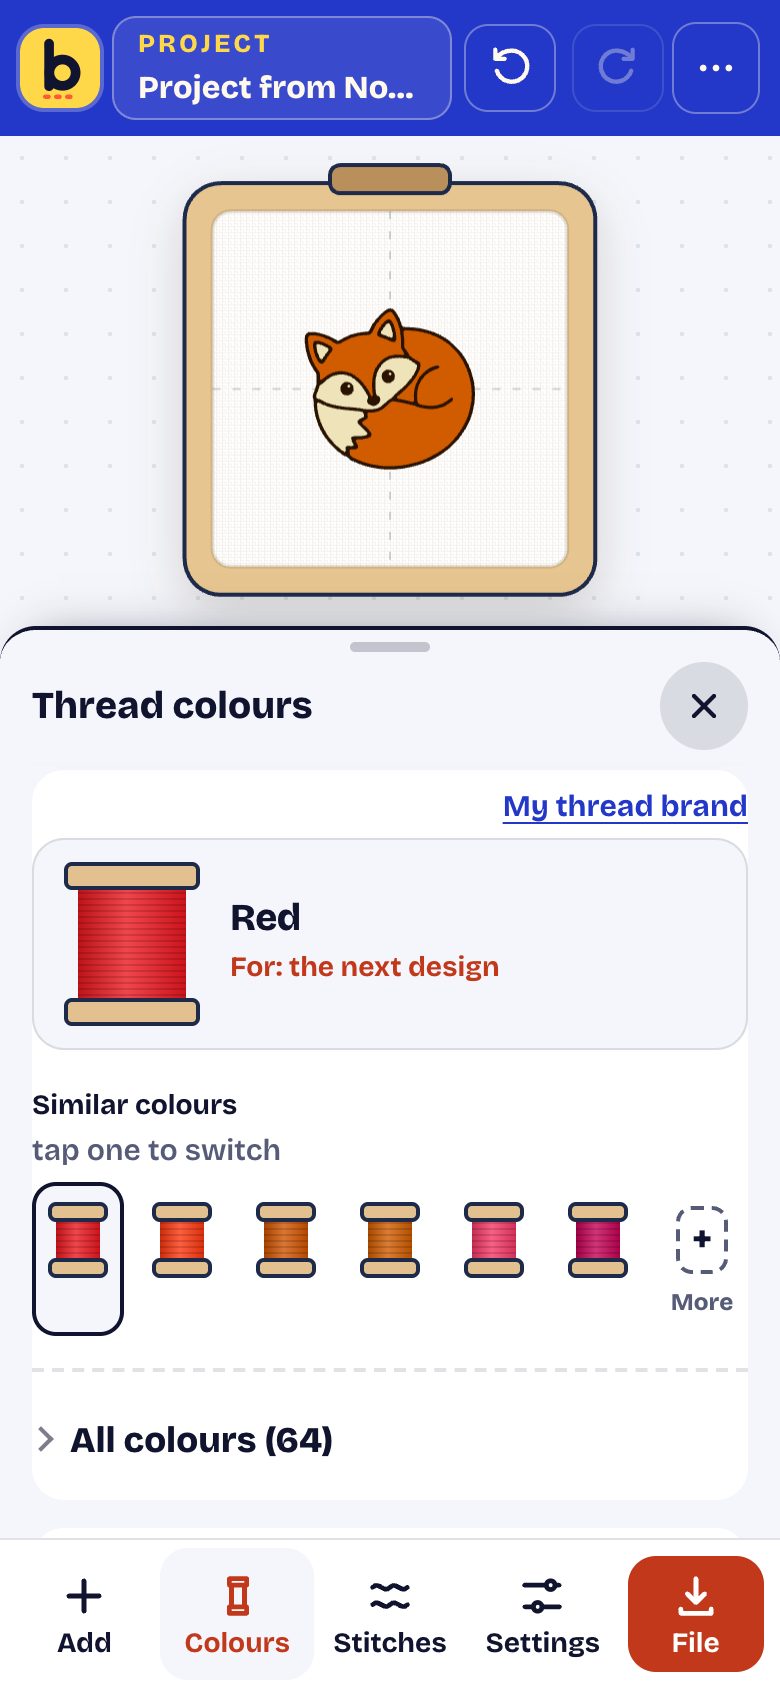
- Similar colours: a row of close threads, tap one to change; More shows others, and All colours (64) opens the whole colour chart.
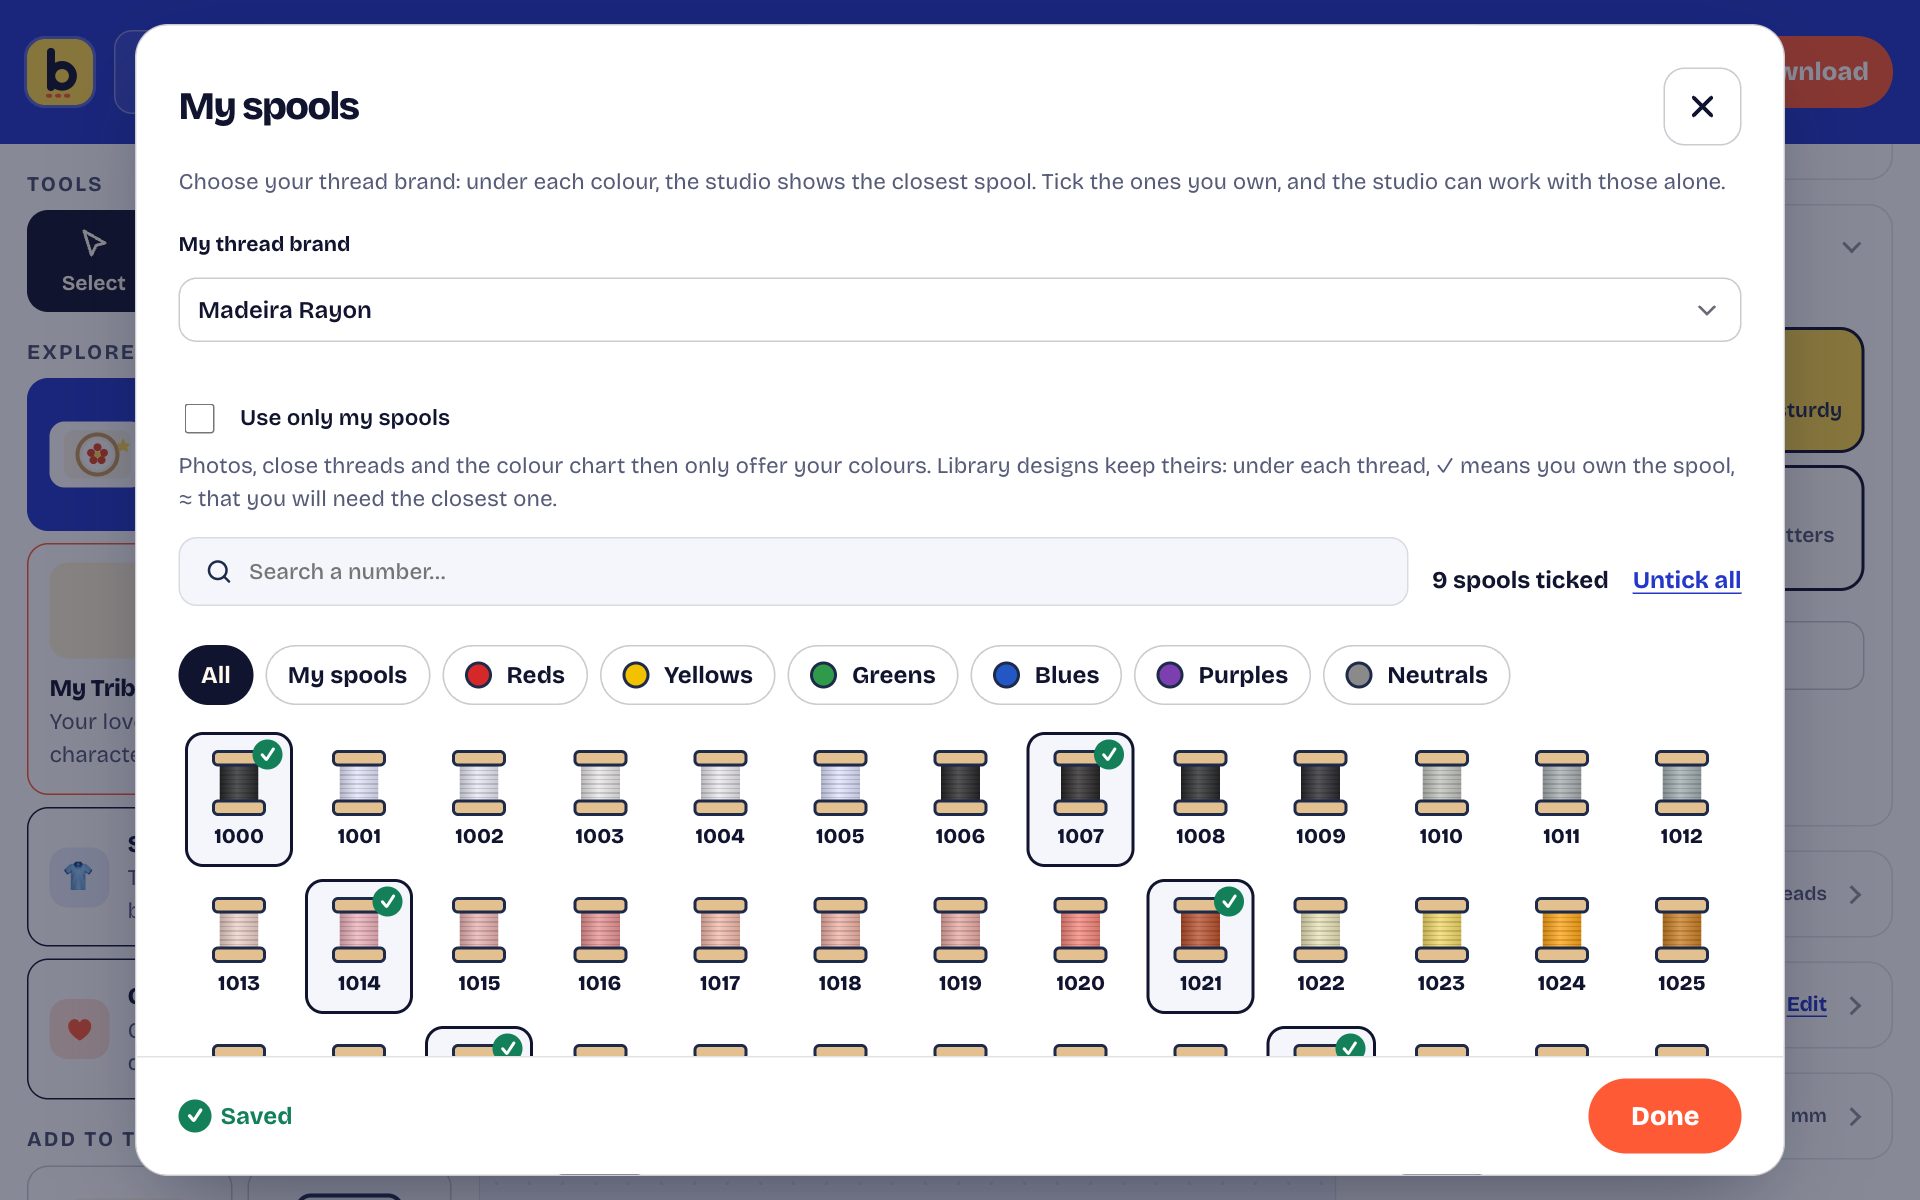
- My thread brand, next to the title, opens My spools: choose the brand of your threads (Madeira, Isacord, Gütermann, Sulky, Mettler and others). Under each colour, the studio then shows the number of the closest spool in your brand. Tick the spools you own: ✓ means you have it, ≈ means you'll need the closest one.
- Use only my spools (from two ticked spools): photos, close threads and the colour chart then offer only your colours. Designs from the library keep theirs; inside a design, the studio tells you whether you have the spool, otherwise suggests your closest one, and Stitch this design with my spools swaps everything in one tap.
- Under Selection, the Outline and Fill buttons switch on and off: keep both, or just the outline for a lighter embroidery. You can also choose the outline stitch from the line stitches described below.
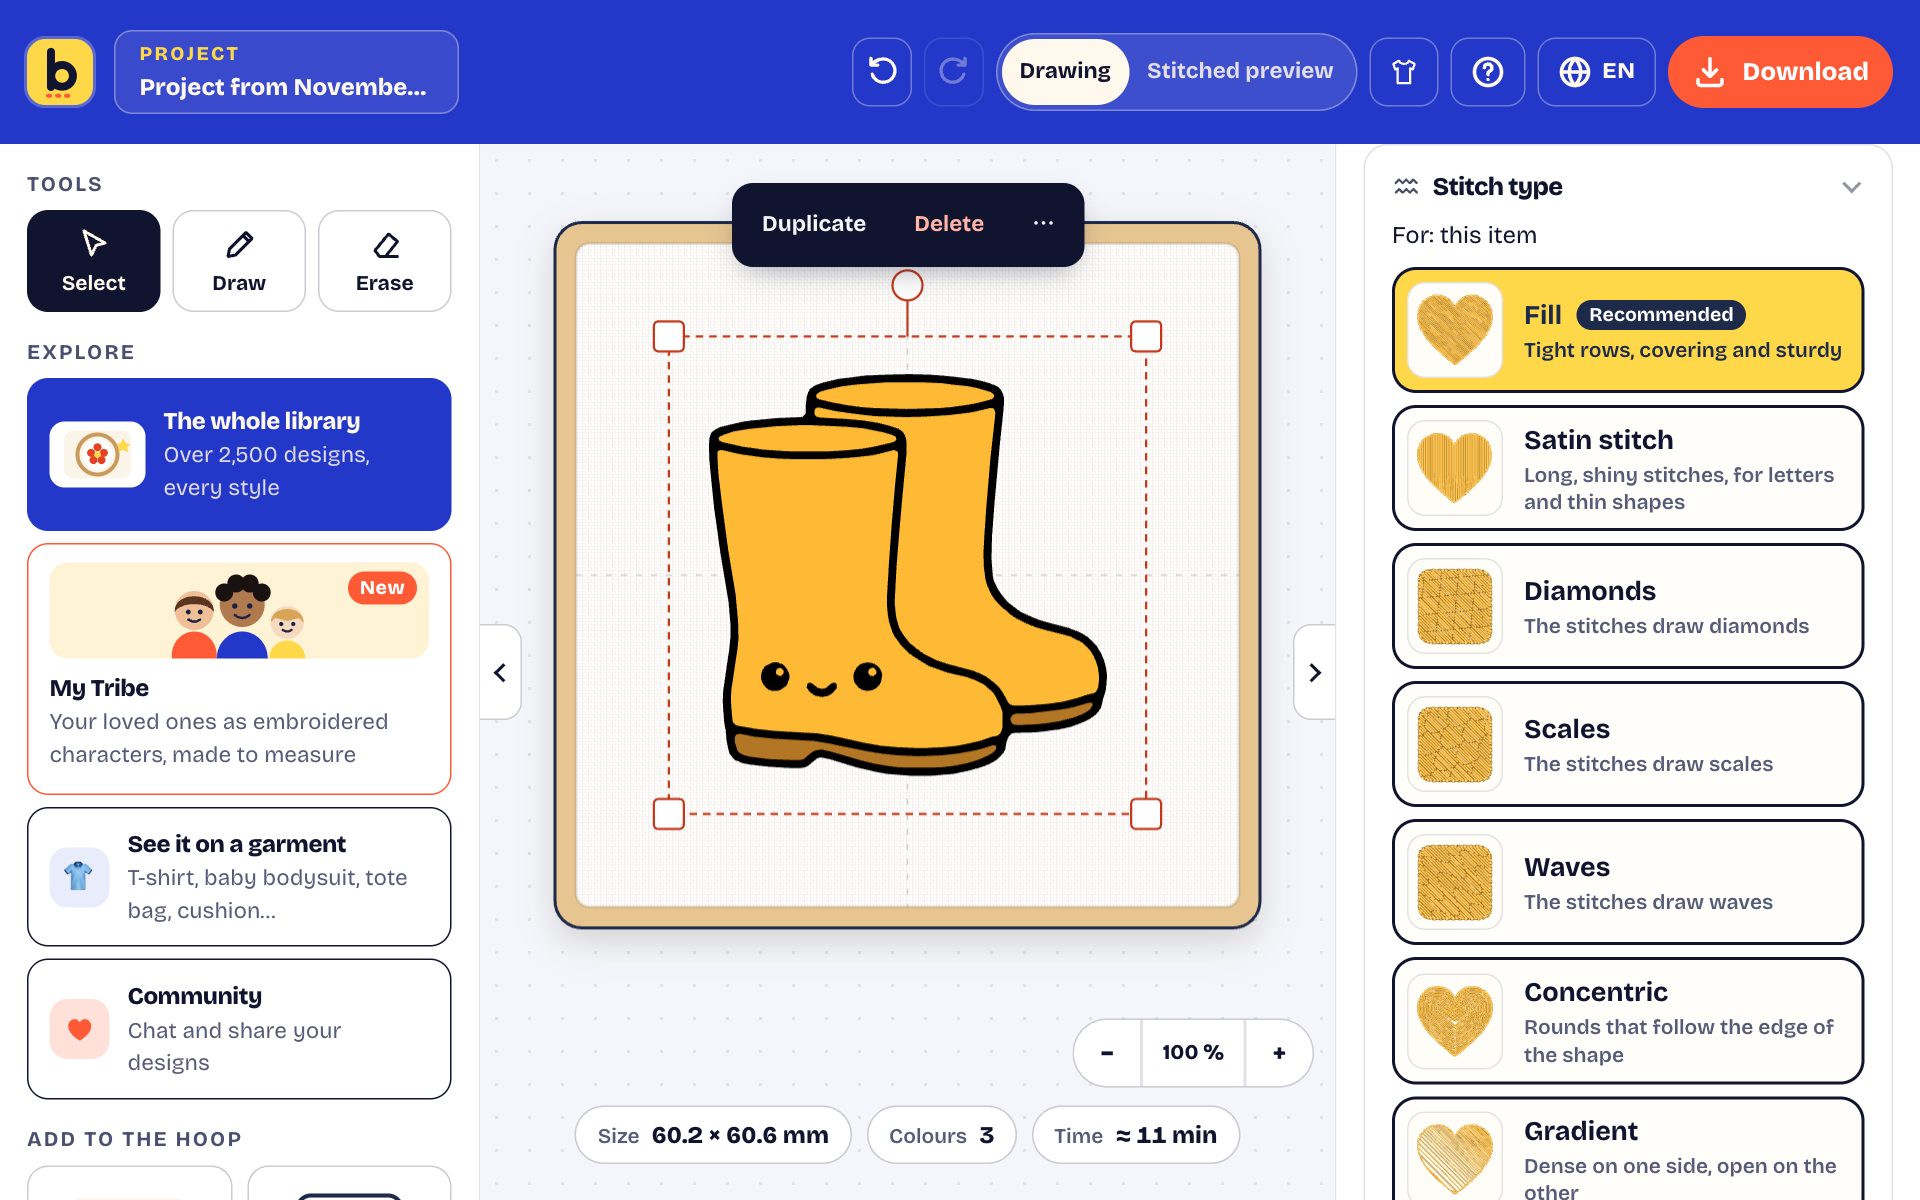
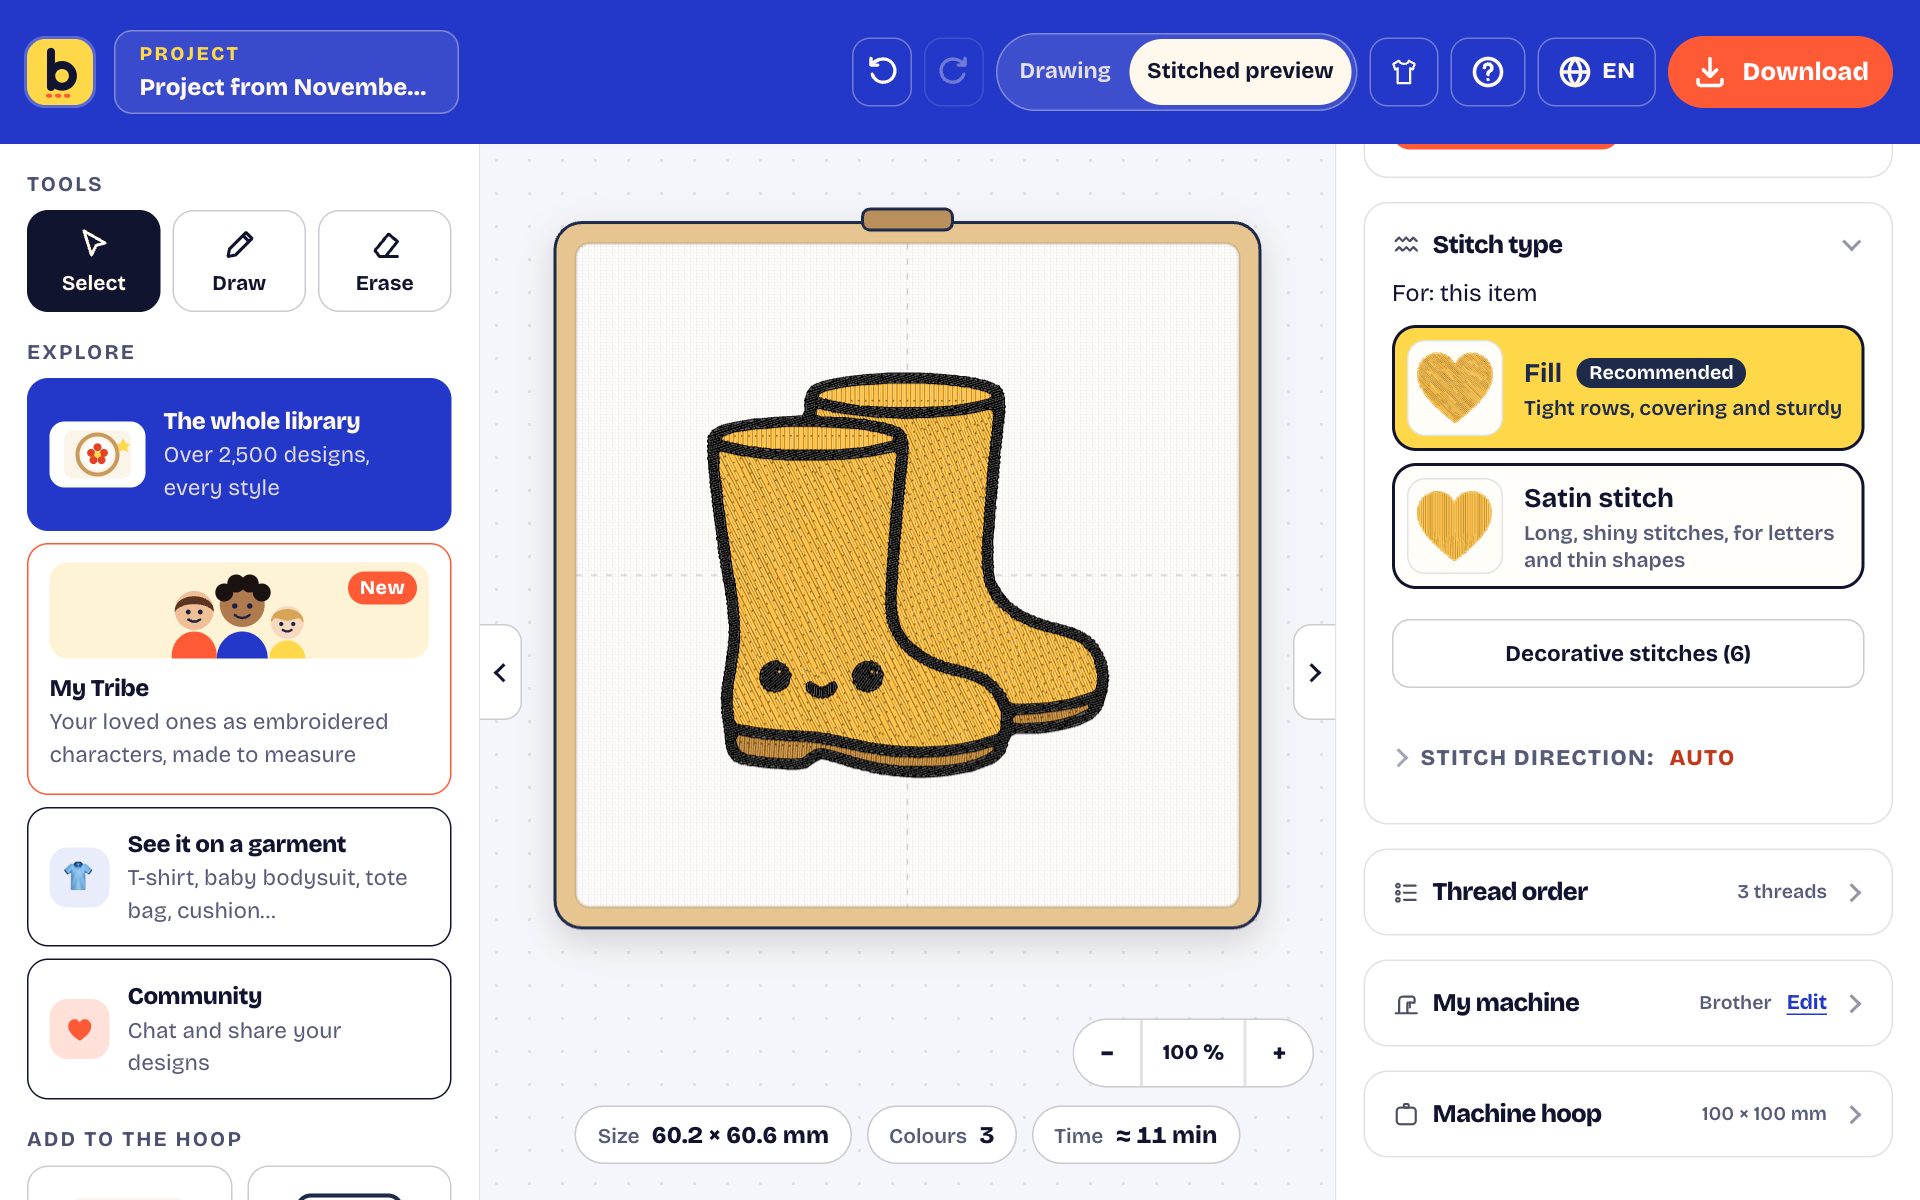
- Stitch type, under the colour: each choice shows a stitched thumbnail. Fill, marked Recommended, covers the shape with tight, sturdy rows; Satin stitch crosses it with long, shiny stitches, ideal for letters and thin shapes; Outline stitches only the edge, in triple stitch. With nothing selected, the choice applies to every item in the hoop.
- Decorative stitches opens the others: Concentric (rounds that follow the edge), Meander (a light winding line, for quilting), Gradient (dense on one side, open on the other), Waves, Diamonds and Scales (the stitches draw the pattern inside the fill).
- Line stitches, for a design's outline and for the pencil: Backstitch (called Triple stitch in the pencil: a crisp, clearly visible line), Running stitch (a fine, light line), Satin stitch (a tight, glossy cord), Blanket stitch (the edge of appliqués), Stem stitch and Chain stitch (a hand-embroidered look), Sashiko (even dashes, Japanese style).
- Stitch direction (folded, open it): in Auto, stitches follow elongated shapes and change direction from one colour to the next, so neighbouring colours catch the light differently. You can also set a direction (horizontal, vertical, diagonal); it rotates with the design. Direction works differently depending on the stitch: in Satin stitch, Auto makes the stitches cross each shape across its width; in Gradient, it sets which way the stitching goes from dense to open; in Waves, Diamonds and Scales, it is the direction of the rows that draw the pattern.
- Stitch settings, at the bottom of the right-hand column, apply to the whole hoop: Density (Light, Normal or Dense: the denser, the tighter the rows and the better the fabric is covered), Fill direction (the starting angle of the rows, from 0 to 175°, 45° by default), Underlay (a few stitches laid first to hold the fabric: leave it ticked) and Crisp outline around each colour (a fine line that keeps the edges clean).
- Thread order shows the order in which the machine will stitch the colours, just like on your machine's screen, with the number of your spools if you've chosen your brand.
7. Writing a name or a word
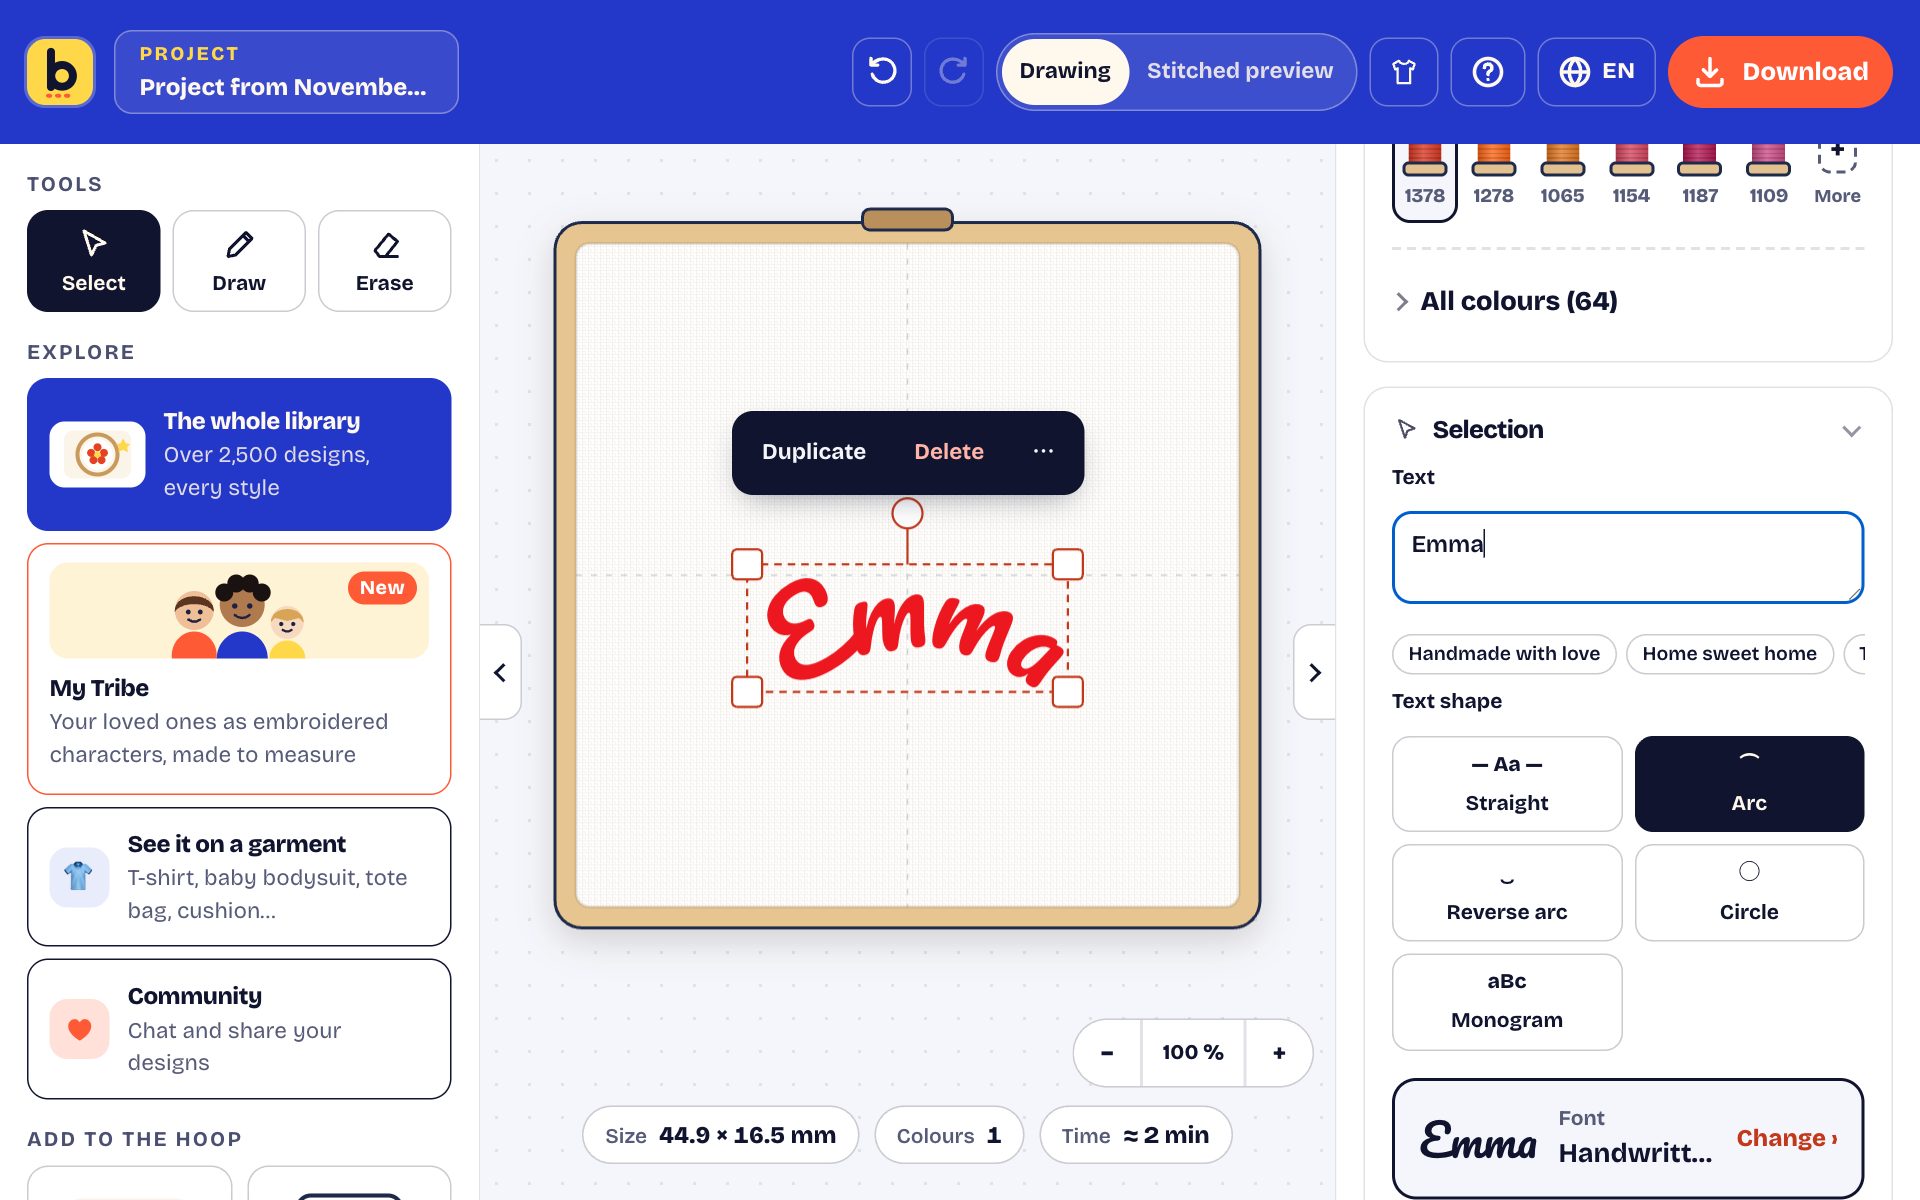
- Under Add to the hoop, tap Text (or the A name, some text card when the hoop is empty), then tap the hoop where you want to write.
- Type your text in the right-hand column. Several lines are possible, for a quote. Ideas are suggested below the field.
- Choose the Text shape: straight, arc, reverse arc, circle, or monogram (the middle letter bigger).
- Under Font, Change opens all the fonts: handwritten, rounded, elegant, block letters…
8. Badges to personalise
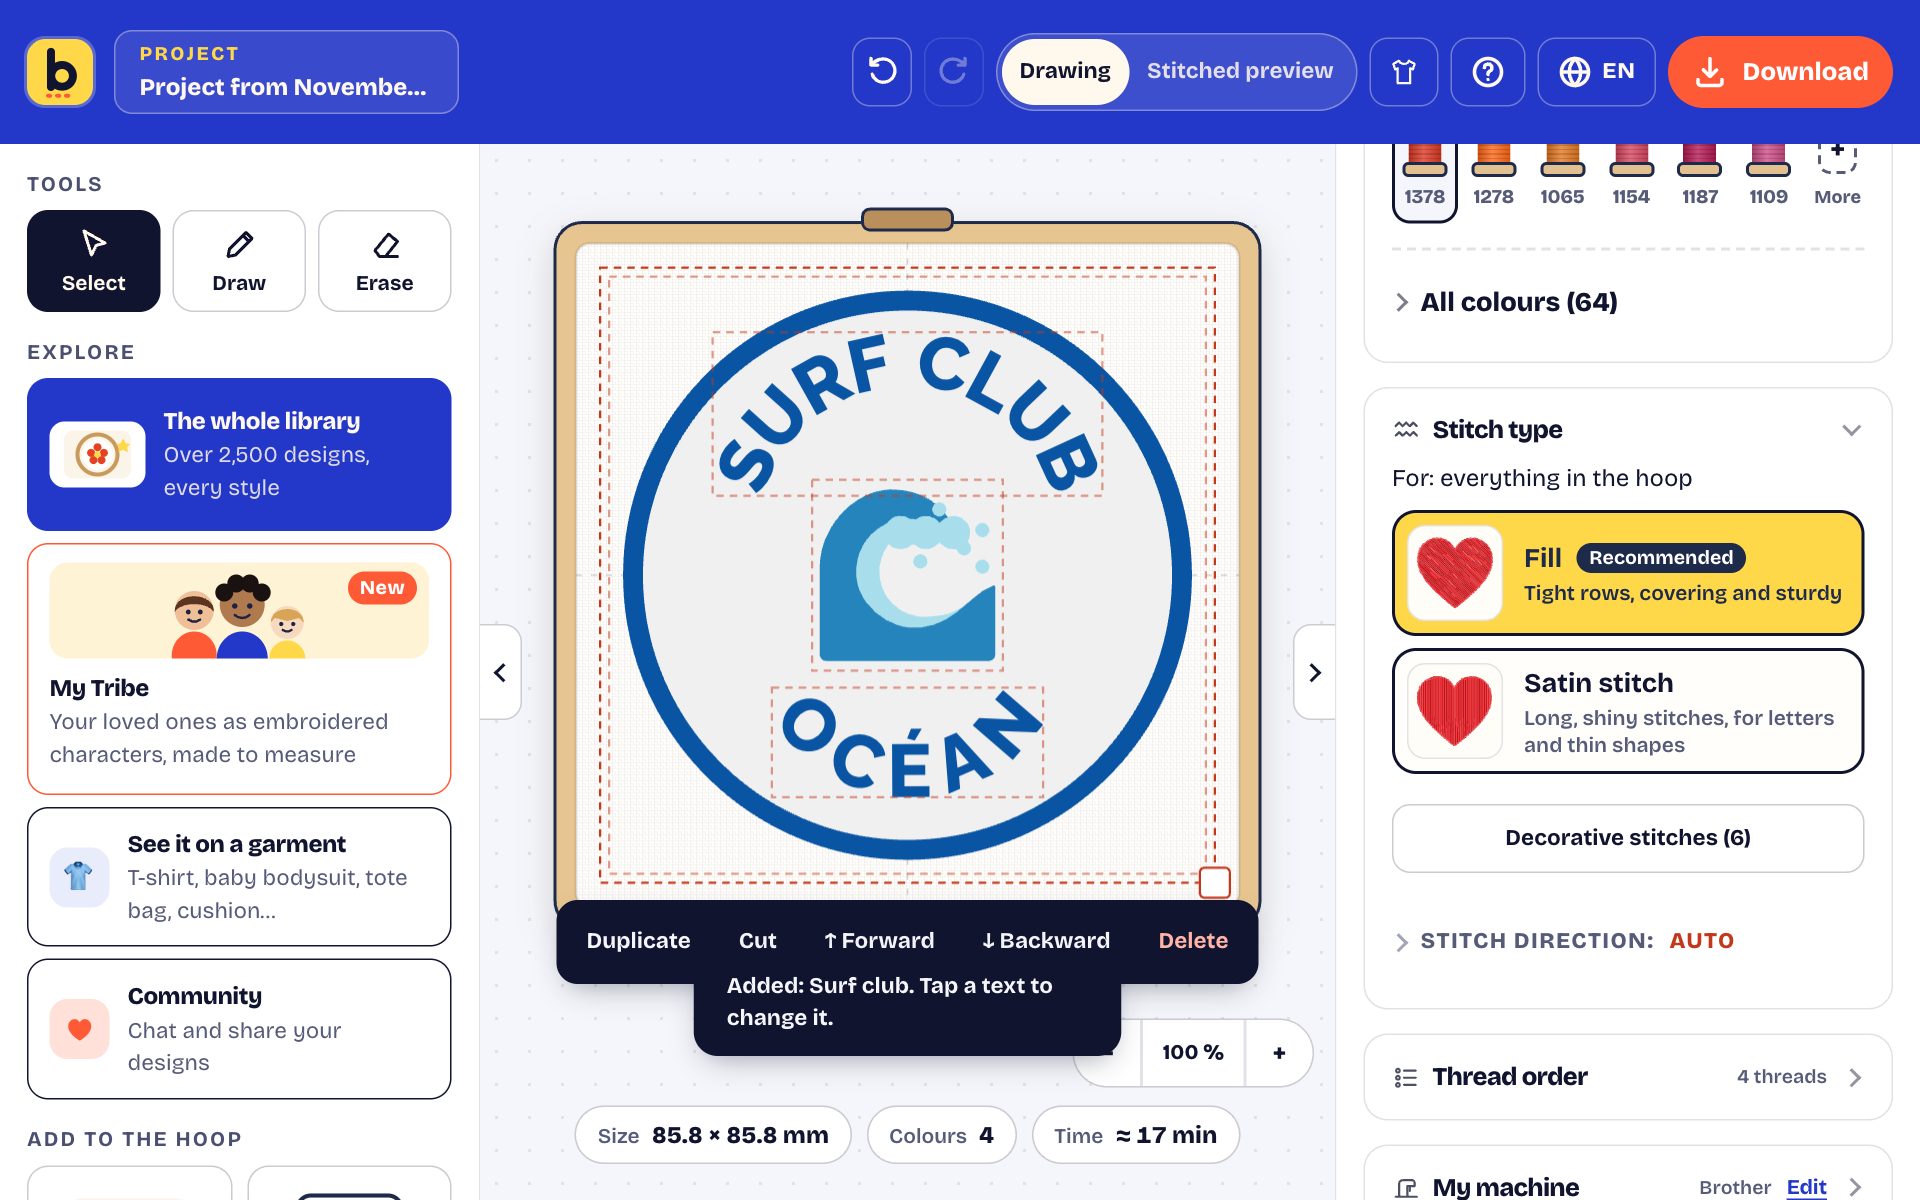
In the library, the Badges to personalise section places a complete layout in one go: the badge shape, a design and texts already set in an arc or a circle. Then tap a text to replace it with the name of your club, a date or a first name.
9. Drawing and erasing
- Draw: draw freehand in the hoop. Choose the line's stitch in the right-hand column: running stitch (the default), triple stitch, satin stitch, blanket stitch, stem stitch, chain stitch, sashiko, or Solid shape, which fills the shape you draw. For satin and blanket stitch, set the width: 1 mm minimum, below that the stitch no longer forms. Line smoothing (Light, Medium or Strong) irons out a shaky hand.
- Erase: run the eraser over part of a design so that part isn't stitched. Its size can be set to the half millimetre, in the right-hand column.
10. Starting from an image or a photo
- Under Add to the hoop, tap Photo and choose an image on your device: a logo, a child's drawing, an icon, a photo.
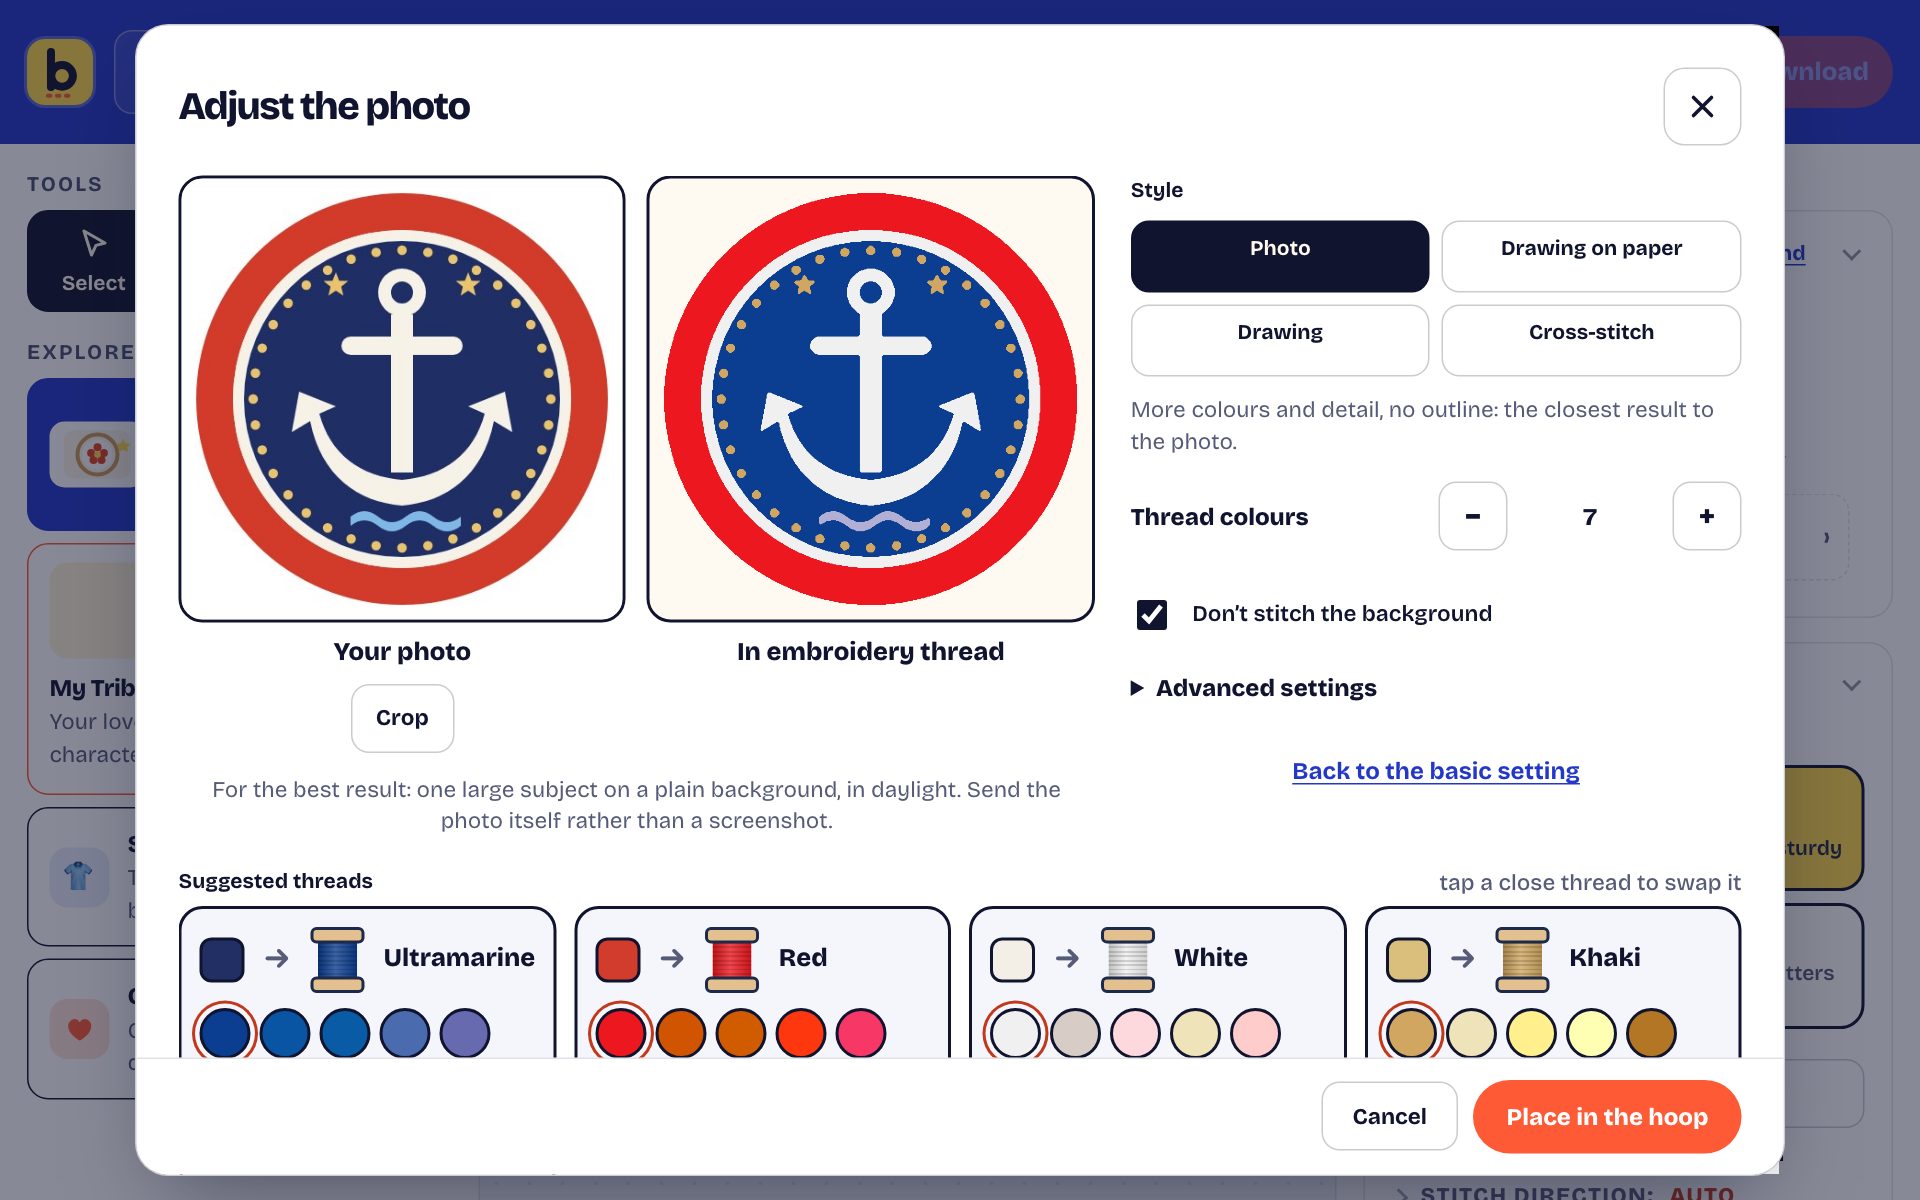
- The Adjust the photo window shows your image and, next to it, what it will look like in thread.
- Choose a style:
- Photo: more colours and details, no outline; the closest result to the photo;
- Drawing on paper: for a photo of a felt-pen or pencil drawing (picked automatically when recognised); the sheet and its shadow disappear, colouring becomes flat fills;
- Drawing: flat colours with crisp edges, outlined in a dark line if the image doesn't have one already; for a drawing, a logo or a pet;
- Cross-stitch: the photo as a grid of little crosses.
- Crop shows a frame on the photo: drag its corners or move it, then Apply. Only what's inside is stitched; Whole photo goes back to the full image.
- Set the number of colours. Under Advanced settings: the level of detail (Simple gives a cleaner result), the brightness, the contrast and the colour vividness.
- Don't stitch the background keeps only the subject: on a photo, the pet, person or main object is cut out on your device (the first time, the studio downloads the cut-out tool, about 7 MB); on a drawing, the plain background is removed.
- At the bottom, under Suggested threads, each colour gets the closest thread (from your spools, if you've chosen your brand); tap another thread to replace it.
- Place in the hoop: the image becomes an item like any other, which you can resize, rotate or adjust later.
Have a vector drawing? SVG file, under Add to the hoop, imports it as it is, with its shapes and colours.
11. My Tribe: embroider your family
My Tribe creates characters of your loved ones, with their names, and places them in the hoop ready to embroider.
- Tap the My Tribe card in the left column, under Explore.
- Four simple starter characters are waiting, as bubbles above the settings. Tap the Add bubble for an adult, a child, a baby or an animal: up to 8 people and 3 animals.
- Pick any colours you like, 8 at most for the whole tribe (a dot marks the ones already used). Once the tribe is placed in the hoop, you swap those colours for your own threads, as with any design.
- Tap a character in the hoop to edit it, drag it to move it, and type its Embroidered name at the top right. A reference photo can be shown alongside to compare; it stays on your device.
- At the top, choose Full bodies or Busts: busts show the faces large, best from 5 people.
- Dress each one category by category: Silhouette (age, build, height), Skin tone, Glasses, Hair, Beard, Headwear (beanie, cap, bow, crown, work helmets…), Outfit (T-shirt, dress, dungarees, sleepsuit, suit, apron…) and Accessories (scarf, tie, pearls, backpack…). The colour of each item is chosen at the top, from your threads.
- For a pet: dogs of several breeds, cats, a rabbit, a hen…, with its coat and, if you like, a collar.
- The small bar above the selected character gives Neutral face, Duplicate, Bring to front, Send to back and Delete; the arrow at the bottom left of the hoop undoes the last change.
- Layout arranges everyone (In a row, Tallest in the middle, Smile curve) and sets the size of each character and name.
- Title · font: tick Embroider the names or Embroider a title, then choose the lettering and its colour. For a family, only joined-up lettering remains, to avoid thread cuts. Drag the title to move it in the hoop.
- Place in the hoop: the tribe arrives in the studio, and the title and names become texts you can still edit.

12. Repeating a design
Select a design and tap Repeat (or Repeat as a pattern in the right-hand column): it repeats across the whole hoop, like printed fabric. Set the spacing side by side and between rows, mix up the positions with Shuffle, or separate the copies with Split into separate designs to move them one by one. Ideal for a cushion background or a scattered tea towel.
13. The stitched preview
At the top, switch from Drawing to Stitched preview: the design appears just as it will come out of the machine, with the direction of the stitches. Below the hoop: the actual size, the number of colours and the stitching time. You can touch an element there to select, move, enlarge, rotate or delete it; during the gesture the drawing shows, then the stitches are recalculated. To Draw or Erase, the studio switches back to Drawing on its own.
14. Seeing it on an item
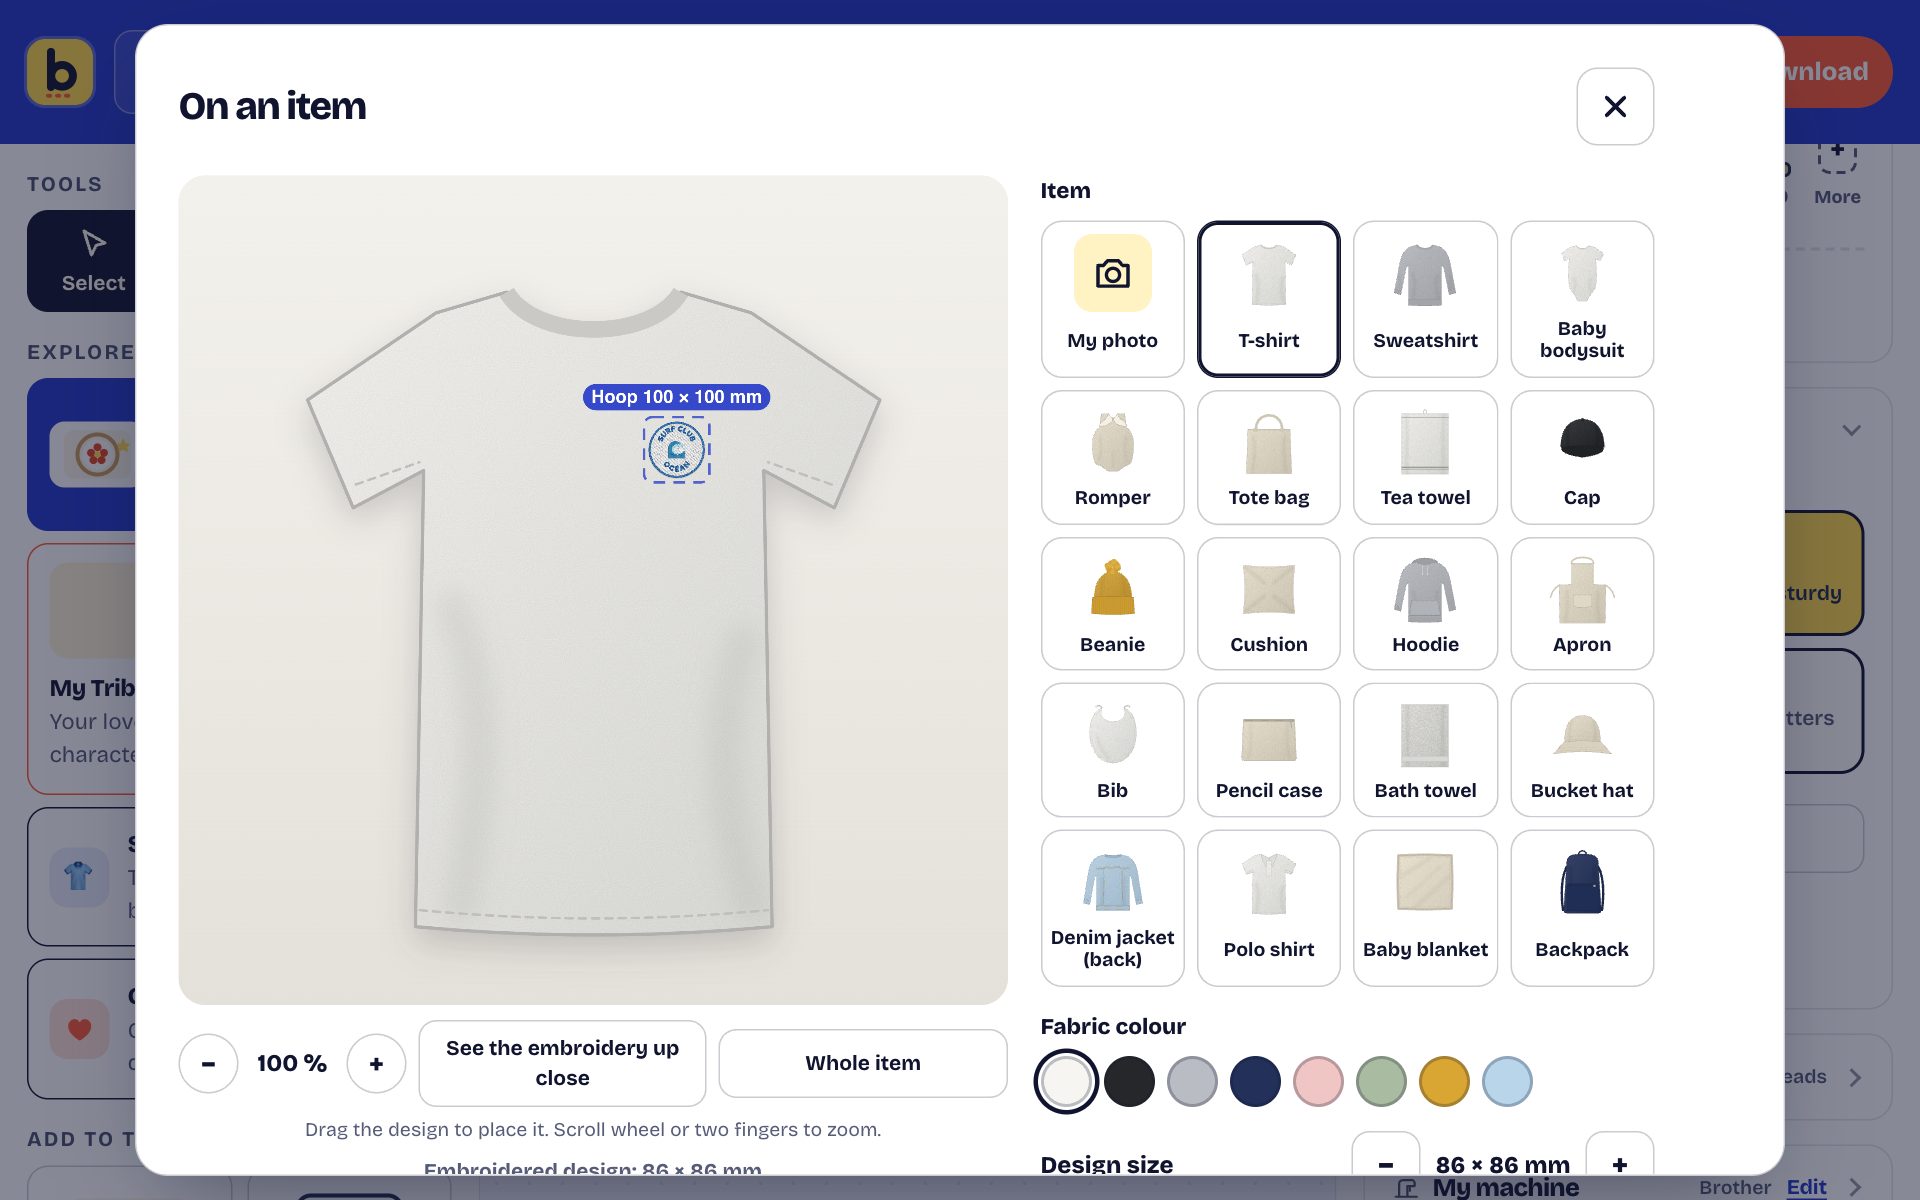
Tap the T-shirt at the top (or See it on a garment, in the left-hand column): your design is placed on a T-shirt, a sweatshirt, a bodysuit, a romper, a beanie, a tote bag, a tea towel, a cap, a cushion… 19 items, at actual scale.
My photo, first in the list, shows the design on your own garment: import its photo, tap where you want to embroider (the design lands there and can be dragged), then place the two yellow markers on two points whose distance you know, the edges of the garment for example, and type that distance in centimetres. The design then appears at its real size on the photo.
- Choose the item and the fabric colour, then drag the design to where you want to embroider it.
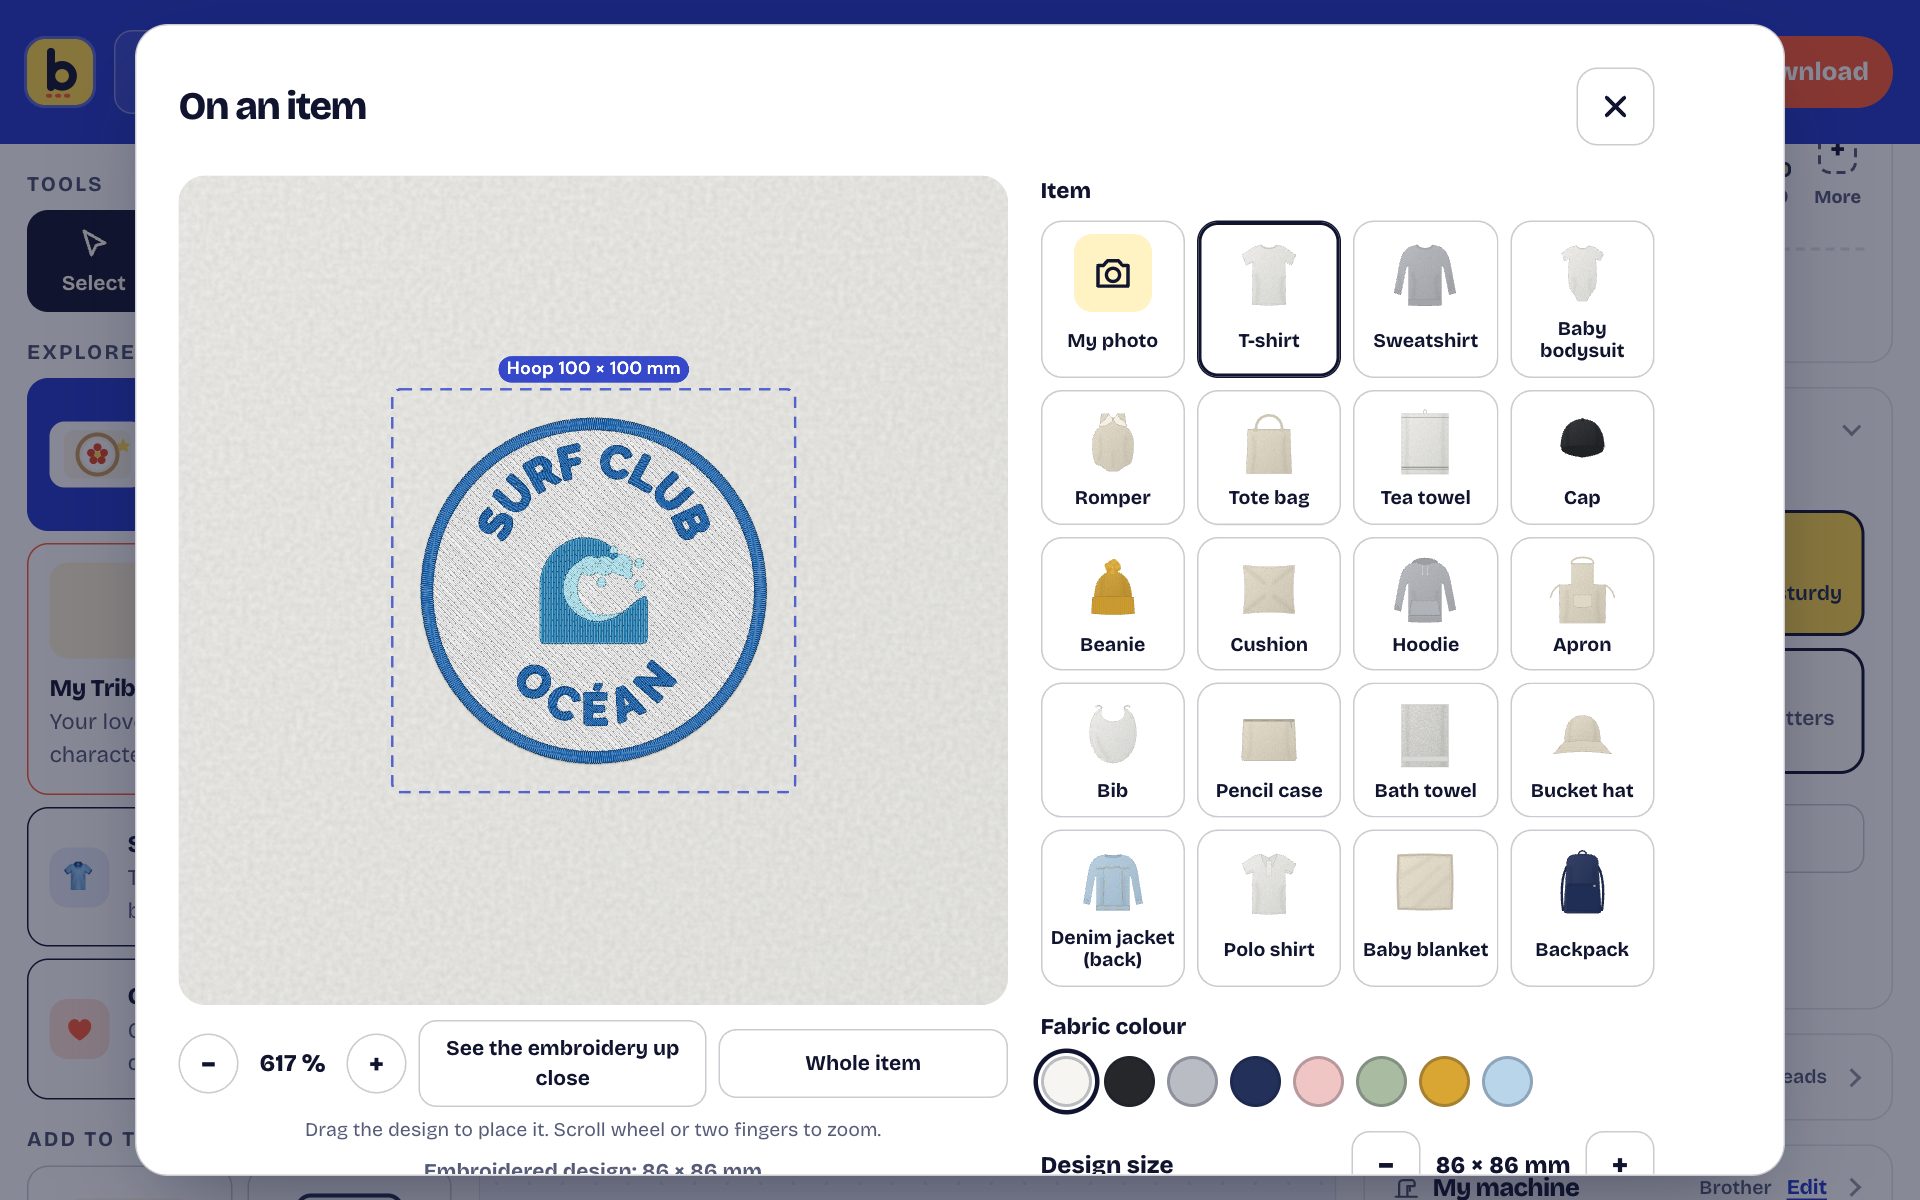
- See the embroidery up close zooms in on the design; you can also zoom with the buttons, or by pinching on a phone.
- Your machine's hoop is shown as a dotted line, at the same scale: you can see what can be stitched in one go.
- Download the image or Share to send it to anyone you like.
15. My projects
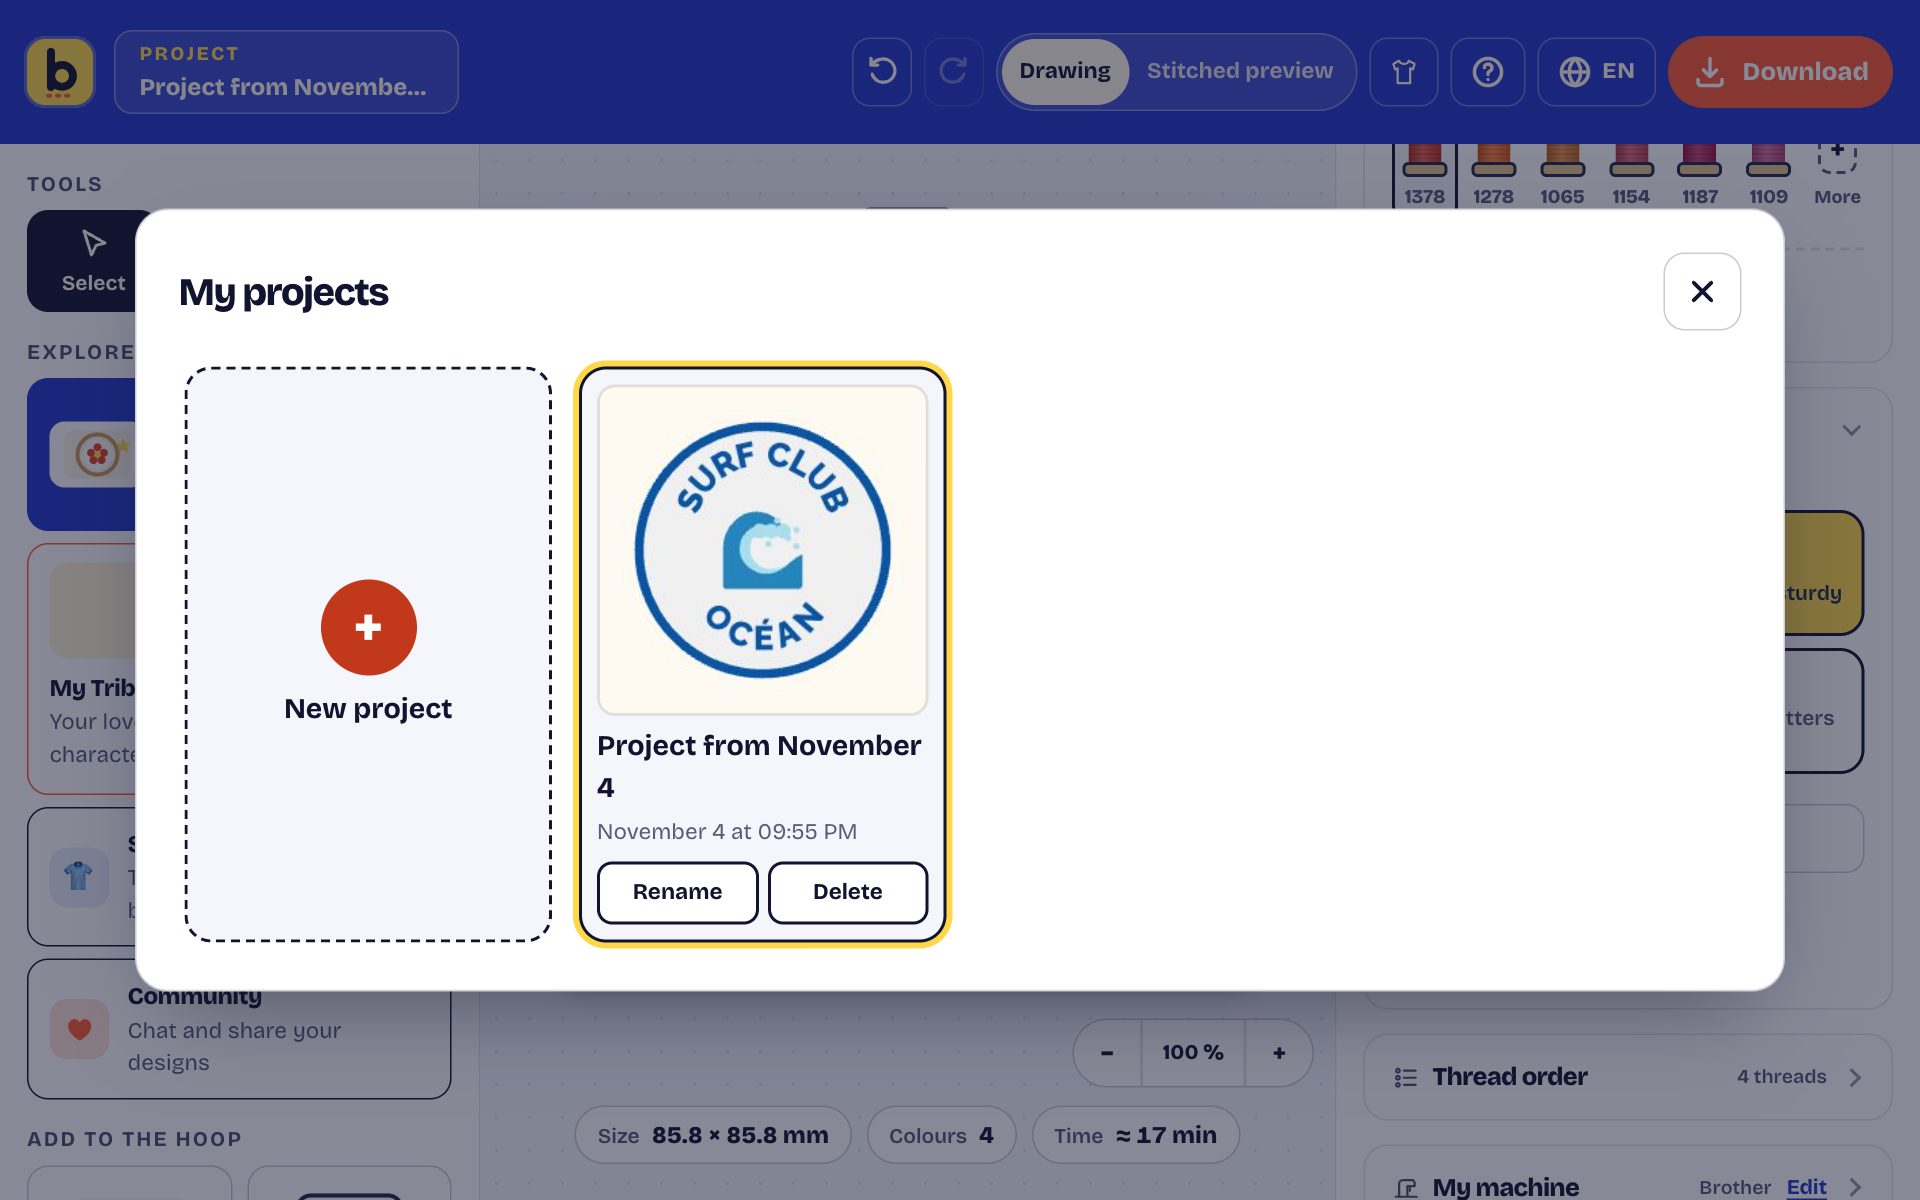
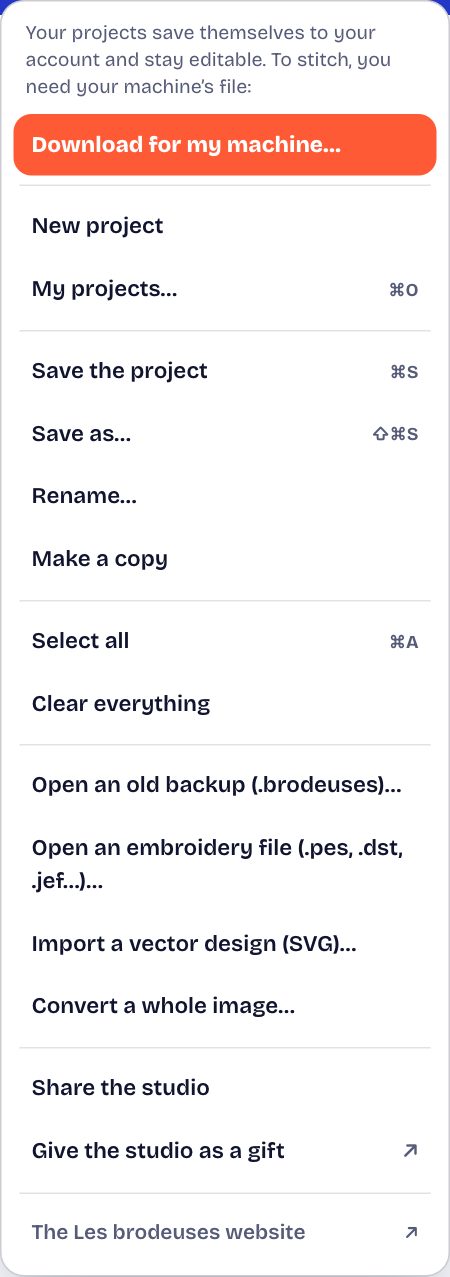
Everything is saved automatically as you go. The Project menu, at the top left, lets you start a new project, open My projects, save under another name, rename, make a copy or clear everything. It also puts the essential first: Download for my machine, the same as the “Download” button at the top right. Further down, it opens an embroidery file, imports an SVG drawing or converts a whole image.
16. Sending it to your machine
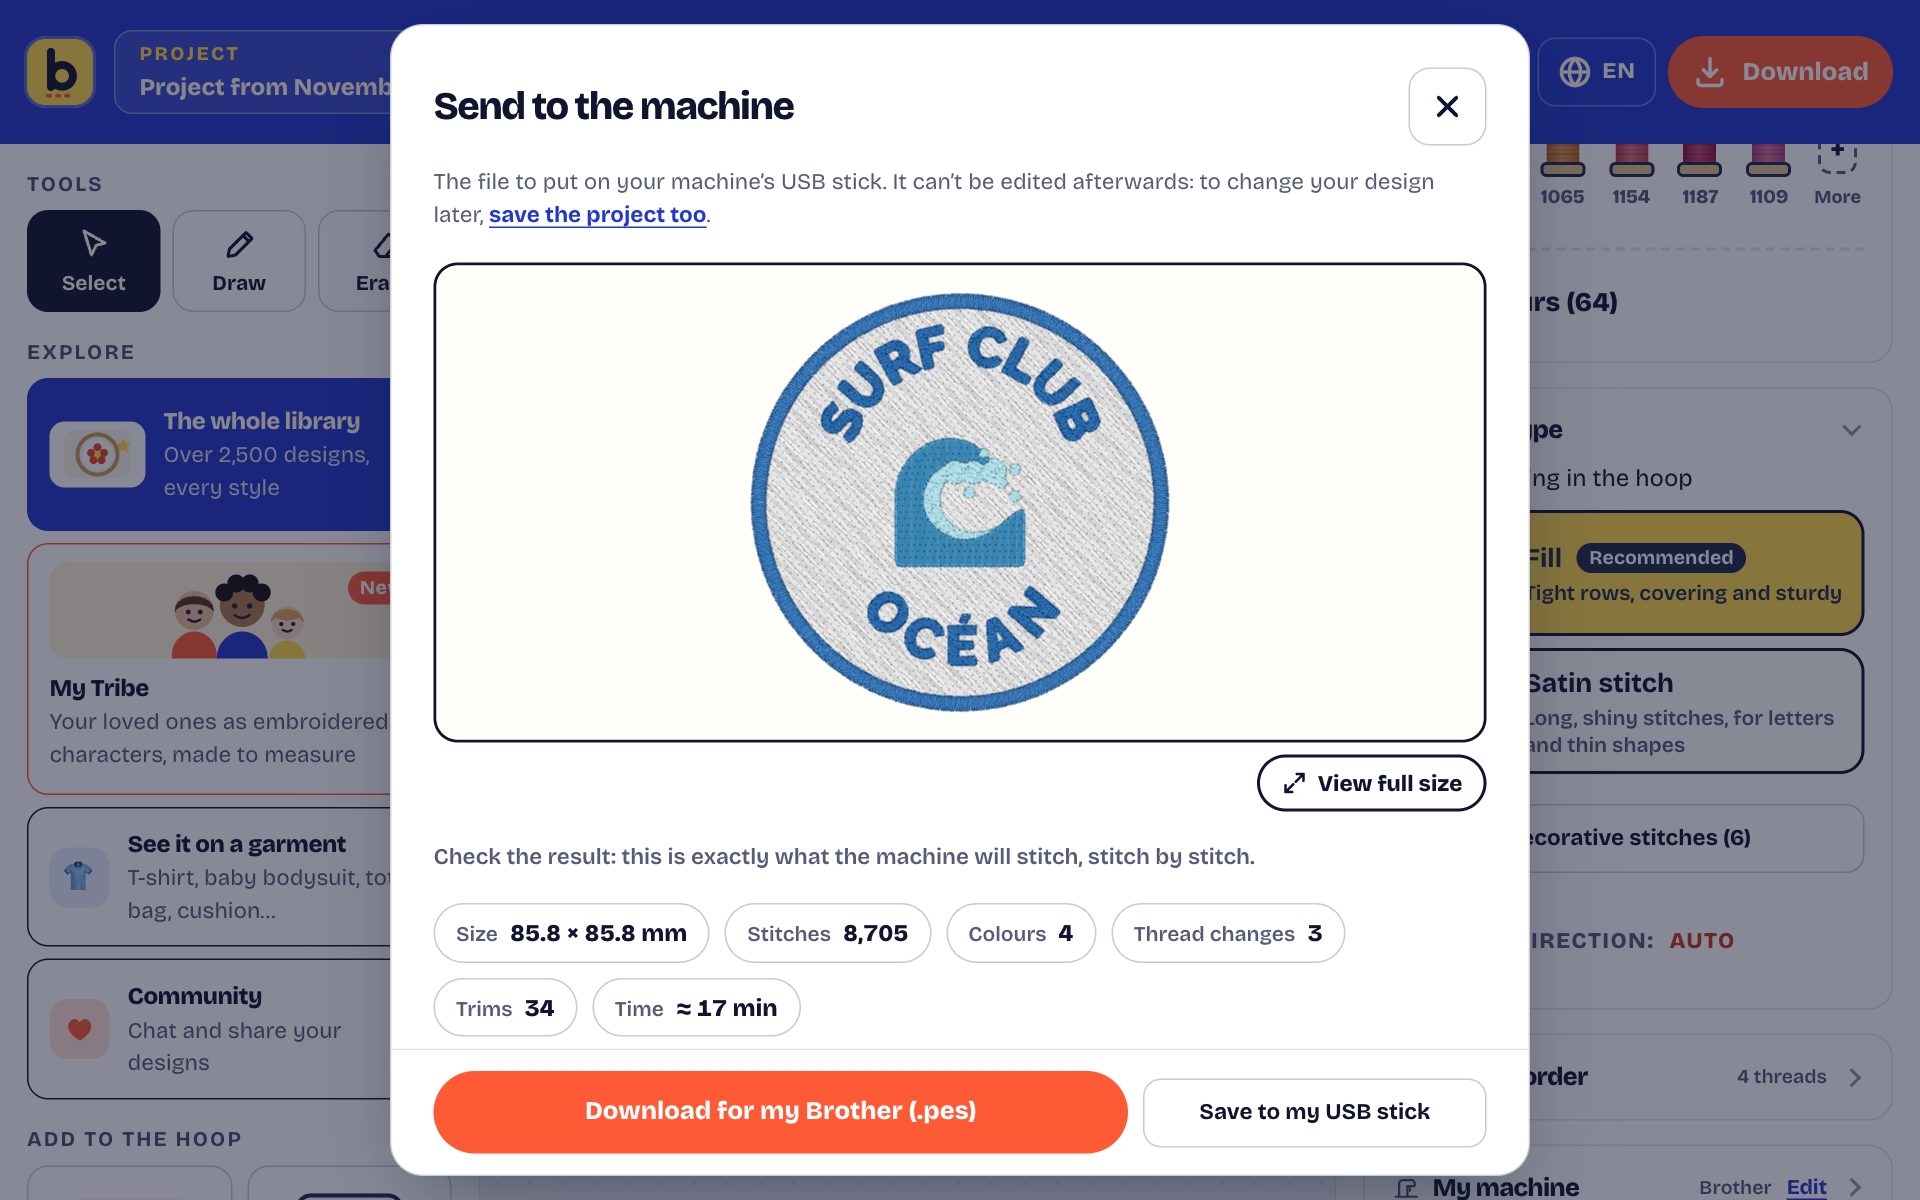
- Tap Download. The Send to the machine window shows exactly what the machine will stitch, stitch by stitch; View full size shows it full screen. Underneath: the size, and the number of stitches, colours, thread changes, trims and the stitching time.
- My machine is already chosen if you answered the questions; otherwise, choose the brand: the studio prepares the right format (.pes, .jef, .exp, .vp3, .xxx, or .dst for another brand).
- Give the file a name. The big button says what it does, for example Download for my Brother (.pes).
- On a computer, with Chrome or Edge, Save to my USB stick writes the file straight onto the stick, in the right place for your brand; the studio remembers the stick. On a phone, Share… sends the file to your brand's app, an email or your computer.
- How do I put the file on my machine? gives the steps for your brand. The link underneath opens the full diagram: USB stick or your brand’s app. For a Brother: the step-by-step USB stick guide.
17. Opening an embroidery file
Already have a .pes, .dst, .jef, .exp, .vp3 or .xxx file? Under Add to the hoop, tap Open a .pes file…: it lands in the hoop, flat in Drawing, exactly as it is in Stitched preview.
- Its colours are listed in the right-hand column: change them, move them up or down in the stitching order, remove the ones you don't want stitched.
- Group identical colours avoids needless thread changes; Mirror ↔ and Mirror ↕ flip it.
- Add a name or another design next to it, then download everything for your machine.
- If the file was downloaded from the studio, the studio recognises it and offers to open the project: everything is editable again (texts, designs, colours and stitches). The file on its own only contains stitches.
18. The community
- Share my design: publish your creation for other embroiderers.
- Shared designs: open someone else's design in your hoop in one tap, then change the name, the colours, the size.
- The feed: ask a question, show off a successful embroidery, reply to others.
- A small dot flags new designs and new messages since your last visit.
- Change my avatar: choose your profile picture.
19. On phones and tablets
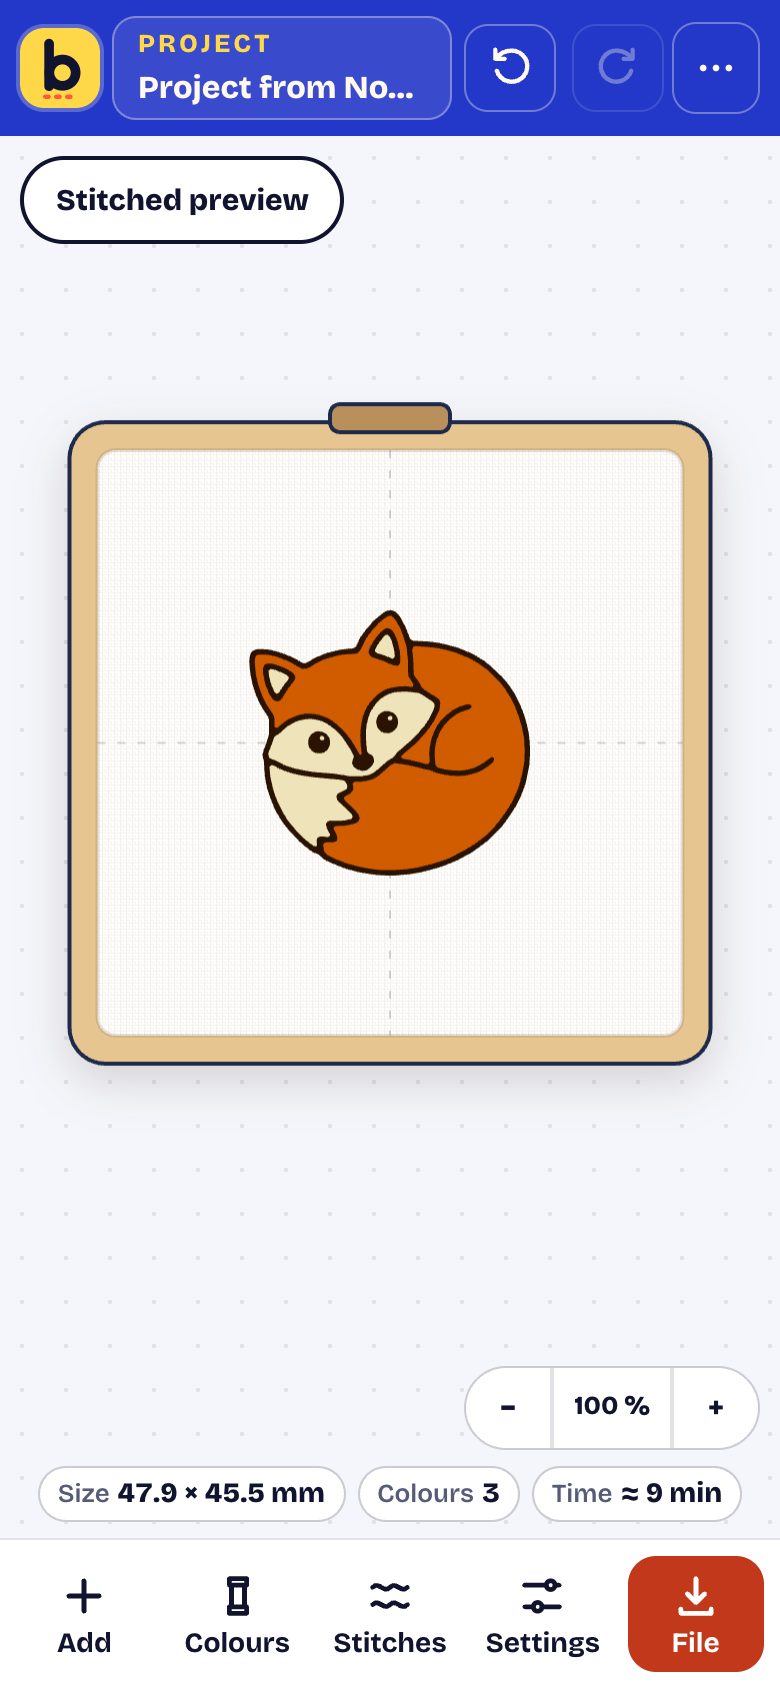
The studio also works on phones and tablets, in the browser. The hoop always stays on screen; at the bottom, five buttons: Add, Colours, Stitches, Settings and File.
- Each button opens a panel under the hoop. To close it, tap the cross, or drag it down, like in any app.
- At the top, ⋯ gathers See it on a garment, the community, My account, help and the language; Stitched preview is above the hoop.
- With a design selected, pinch with two fingers to resize or rotate it.
- With nothing selected, pinch to zoom into the hoop.
- In the browser's share menu, Add to Home Screen adds the studio like an app.
20. Help and the guided tour
The question mark, at the top, opens the help:
- Replay the guided tour: a few bubbles that show the main areas of the studio;
- My machine: brand, hoop and threads: the three questions from your first visit;
- Step-by-step tutorial: this page.
21. Sharing the studio, giving it as a gift
Does someone close to you embroider too? In the Project menu (top left) or in My account:
- Share the studio opens the share menu of your phone or computer (message, email, social media). If there isn't one, the link is copied: paste it wherever you like.
- Give the studio as a gift opens the gift card page.
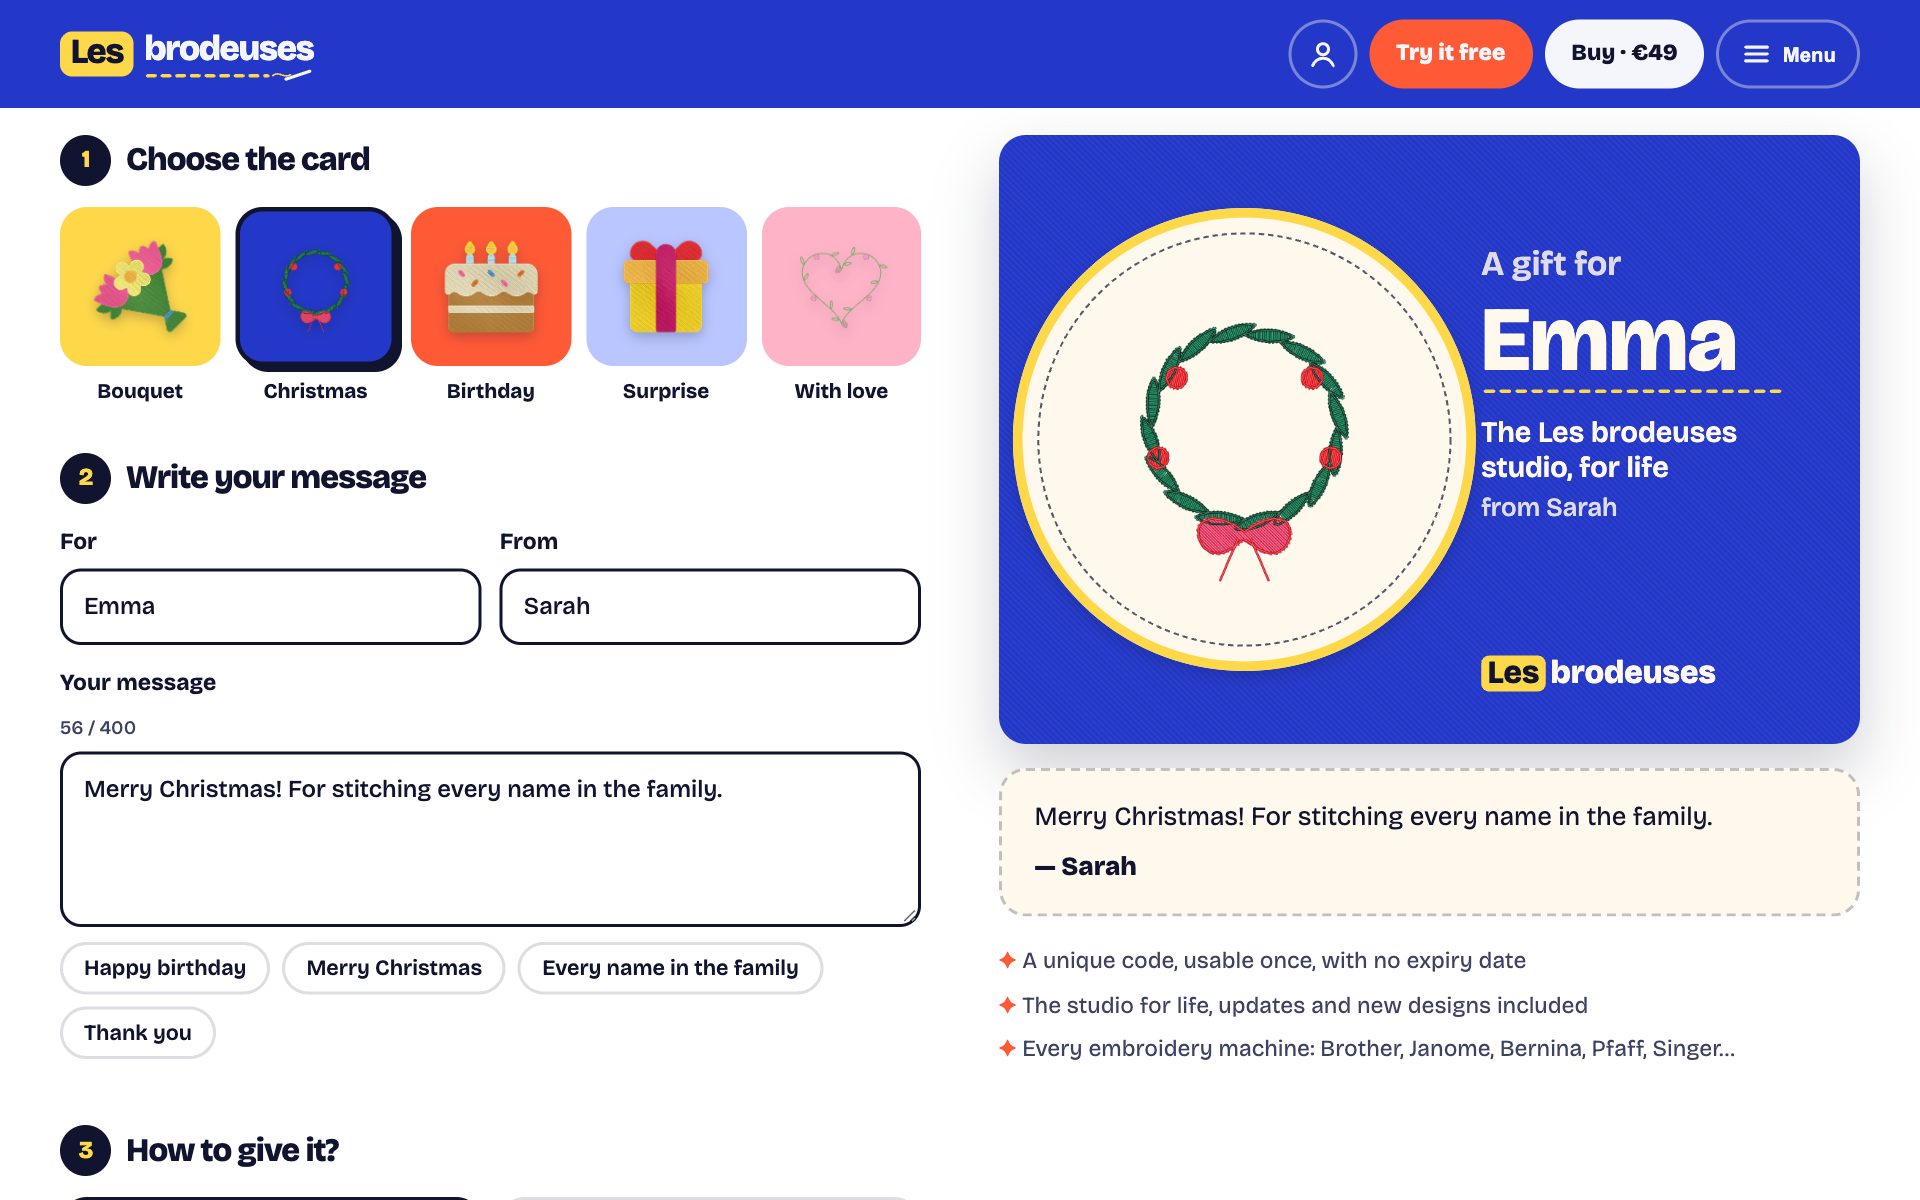
On the gift page, in four steps:
- Choose the card: bouquet, Christmas, birthday, surprise or with love, each with its own embroidered design.
- Write your message: their name, yours and a few words. The card updates as you type.
- How to give it? By email, on the day you choose at 8 am (24 December, their birthday…), or I'll print it to hand it over in person.
- Payment: €49 by card. You immediately receive a copy of the card, its code and the invoice.
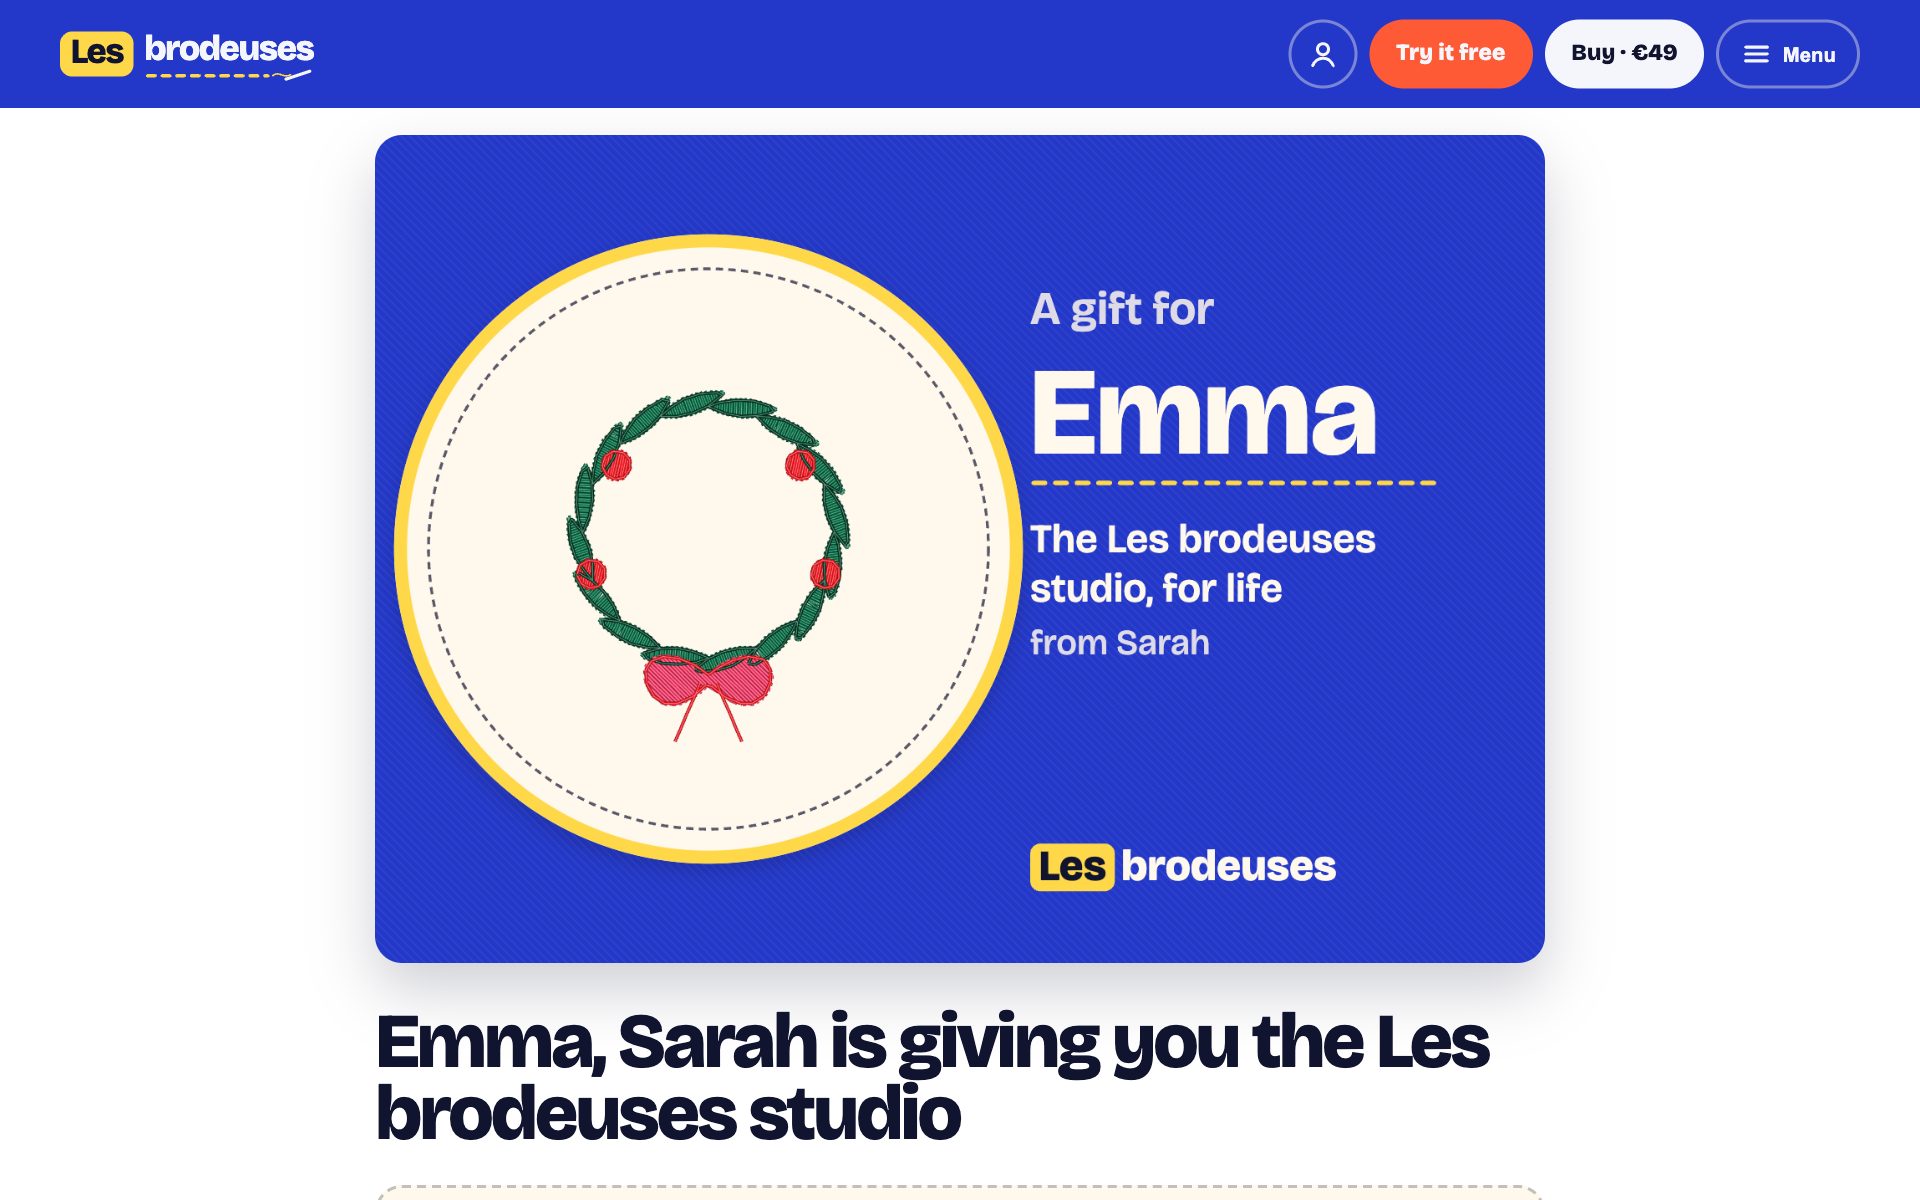
After payment: Download the card to print (PDF) gives you a PDF (the card at the top, your message, the code and a QR code at the bottom, to fold or cut out). Send the card by message sends it by WhatsApp, text message…
The person who receives it opens the link (or goes to brodeuses.fr/en/cadeau and types the code). They discover your card and your message, then Open my gift: they create an account (or sign in), and the studio is theirs for life. You don't need an account to give it.
- The code works only once, with no expiry date.
- If the person already has the studio, the code isn't used up: it can be given to someone else.